Author Topic: Photos of 1967 San Jose pinchweld blackout paint  (Read 3372 times)

Offline redlinetom

  • Newbie
  • *
  • Posts: 6
Photos of 1967 San Jose pinchweld blackout paint
« on: July 29, 2012, 11:38:44 PM »
I'm ready to apply blackout paint on the pinchwelds on my Wimbledon White GTA Coupe and wanted to see some photos of original applications.

Thanks!     Tom
« Last Edit: June 30, 2016, 06:34:38 PM by J_Speegle »

Offline J_Speegle

  • Administrator
  • Hero Member
  • *****
  • Posts: 24623
Re: Photos of 1967 San Jose pinchweld blackout paint
« Reply #1 on: July 30, 2012, 12:19:06 AM »
Welcome Tom

Pretty easy straight forward request. Have not noted any changes through the year so we'll let you get by without mentioning when the car was built - this time ;)

Remember that

- this was applied with front fenders not yet installed and as far as I can tell the rear valance was not pulled into the body as of yet in 67.

- Application is from the front leading edge of the pinchweld in front of A pillar to the rear edge of the pinch weld at the valance normally. 

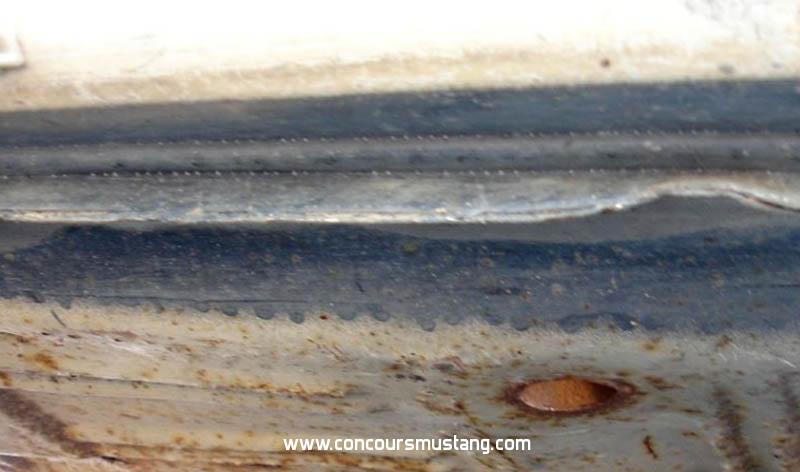
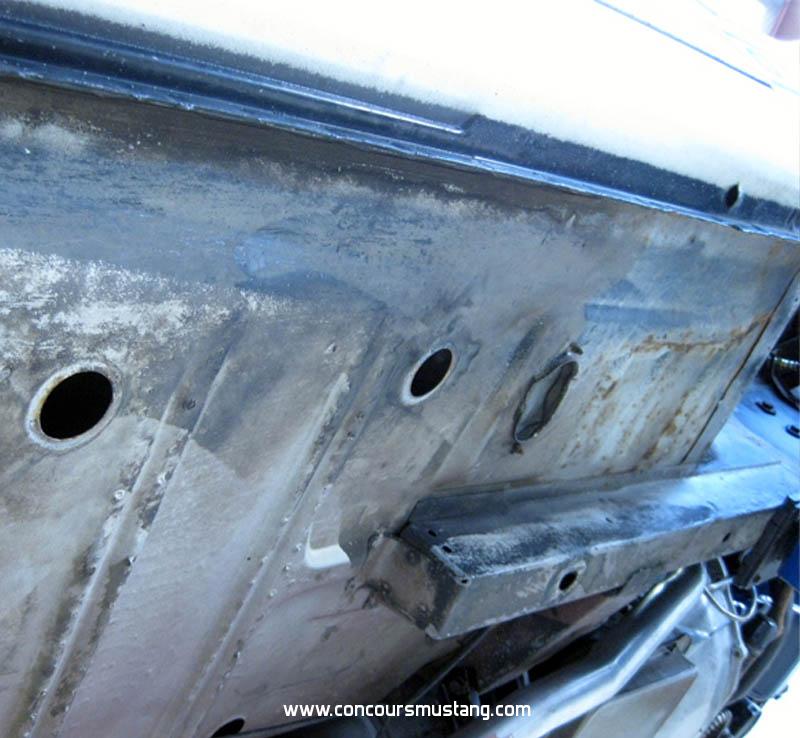
- Applied with less pressure but with the same style of spray gun there was allot more overspray on the floor pans and any surface that hung downward (front frame rails, front seat supports on a conv, forward rear spring mounts and so on) to the point of runs often found on the torque box. In pictures allot of it has worn away over the years.

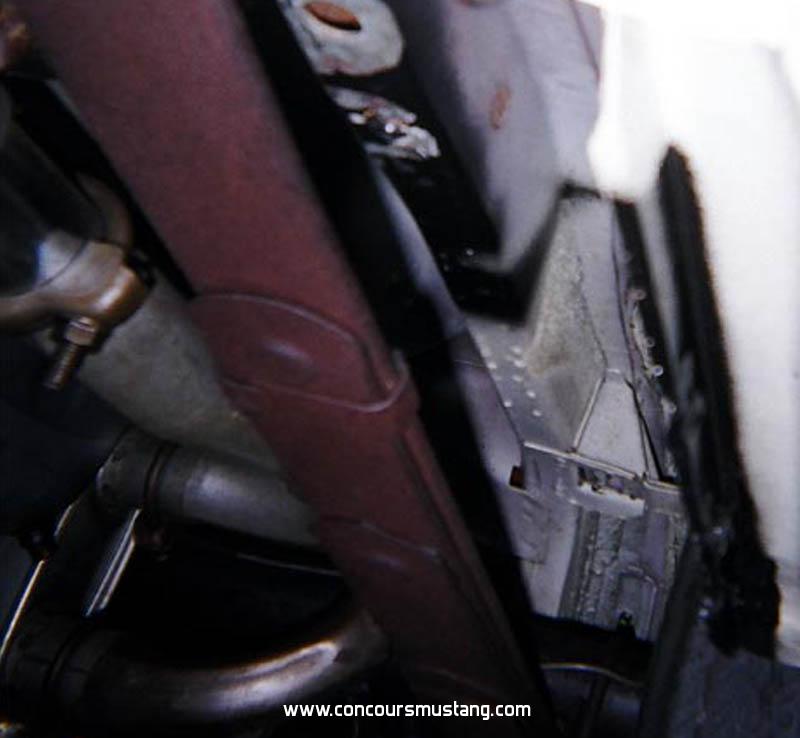
-  At the front and rear edge of the rearwheel well opening we often see a fair amount of black overspray onto the areas directly behind produced when the gun reached the edge and began again at the rear.

- When applying the black to area behind the rear wheelwell the angle often produced allot of overspray onto the rear frame rails bottom and outer surface due to the angle.

- All are not the same and angle and depth of overspray was likely related to the height, age and effort of the worker - but they are pretty consistent

- Edge was not masked (upper/outer edge) but instead appears that there was a mask used that normally produced a somewhat "fuzzy" edge to the black.

Hope this helps. Have plenty more - just grabbed a little of this and a little of that as I have a fair amount of examples. NOTE: please be aware that these are original old cars so often much of the lighter overspray is gone or has been cleaned off. In other examples later paint jobs or chipping can cover or have allowed the removal of some of the paint but you can fill in the blanks as you look at all the pictures in total

Applied at a greater angle - more paint (runs) on the close stuff - less overspray further in


Large amount of overspray behind the rear wheelwell on this example due to angle


Example of soft edge on the outer edge of the black out - typical
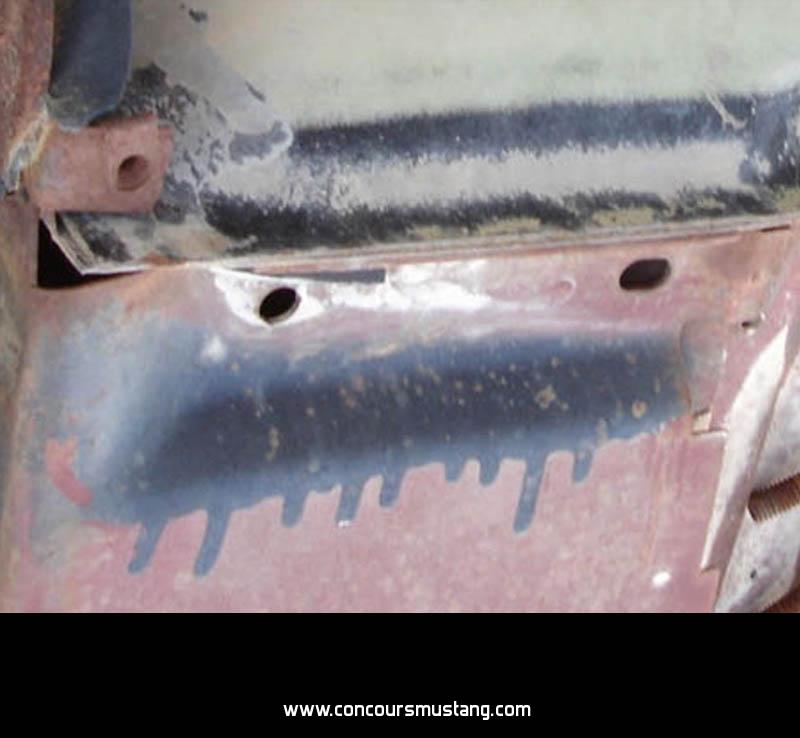


This example a slightly sharper edge but still not tapped nor perfectly straight
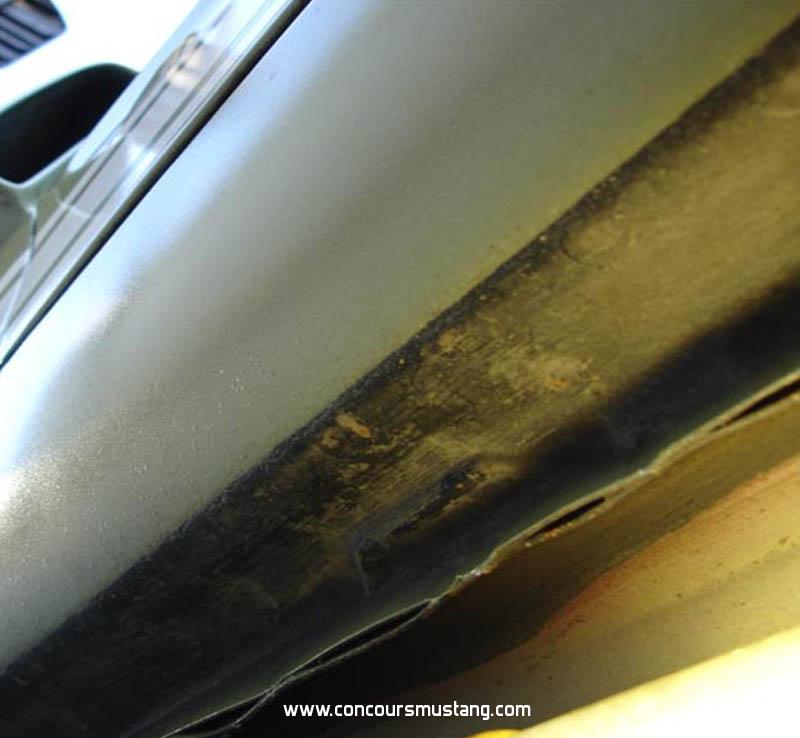


Angle these workers/painters used was not as great compare to some other examples above and below - producing allot more overspray on all the panels below
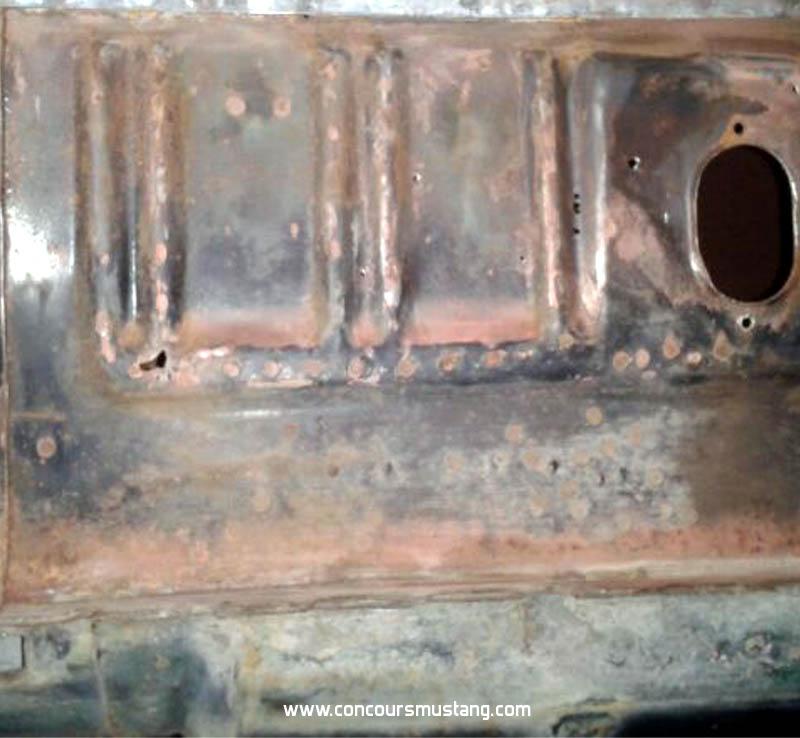


We see other high angle higher angle applications above in other pictures where the jet/gun was so close and the angle so great allot of paint built up on close panels reducing the amount and coverage of overspray inward on the undercarriage

 As the spray gun or mounted jet reached the leading edge of the the rear wheel well and beginning of spaying again at the rear edge of the rear wheel well opening the paint the process produced "blow outs" on the surfaces behind and slightly above (in places) the pinch weld

Front/leading edge of opening example
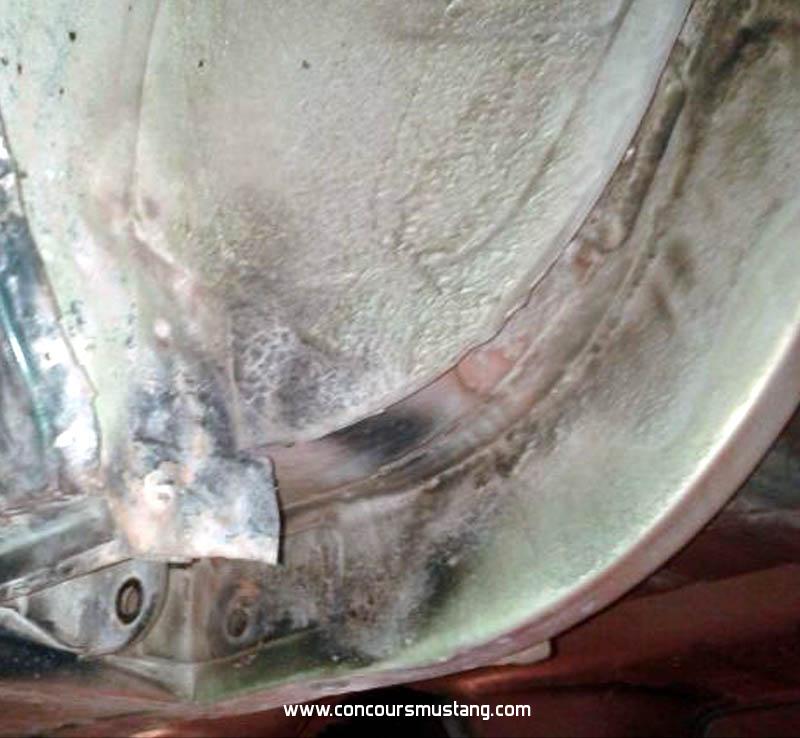


Rear/following edge of the opening. Further back you can make out the overspray from the rear quarter panel pinchweld blackout on the frame rail. Much easier to see this detail in the second picture from the top in this post
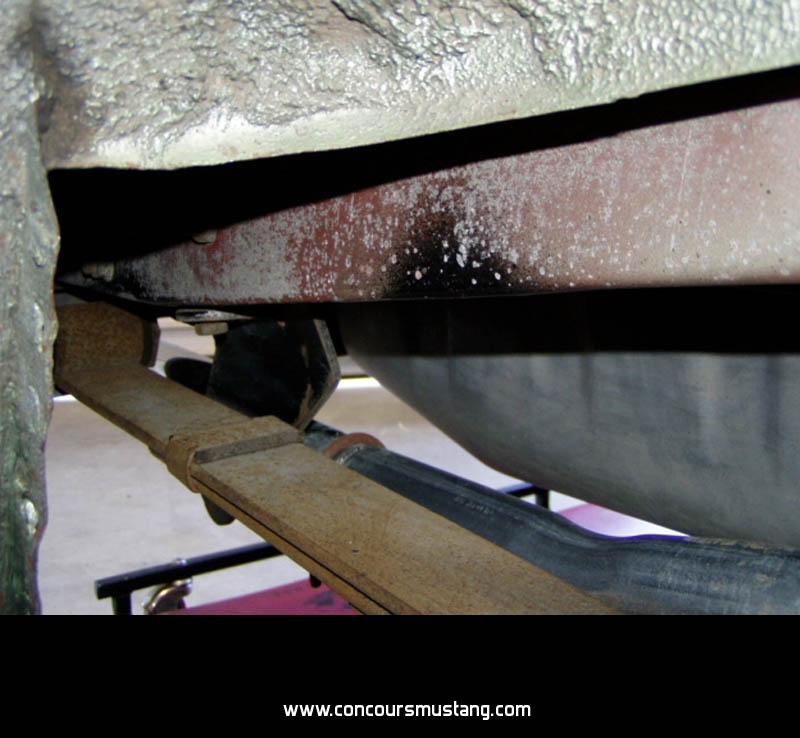


Often it is found greater/larger than these examples

Hope this helps
« Last Edit: October 19, 2017, 04:12:12 PM by J_Speegle »
Jeff Speegle

Anything worth doing is worth doing concours ;)

Offline redlinetom

  • Newbie
  • *
  • Posts: 6
Re: Photos of 1967 San Jose pinchweld blackout paint
« Reply #2 on: July 30, 2012, 03:07:59 PM »
Jeff,

Thanks for the thorough response.  Point taken on including the build date (12.16.66) on questions.   I found the photos & narrative to be very helpful and look forward to tackling the job.

Tom

Offline bbs428

  • Jr. Member
  • **
  • Posts: 54
  • Retired navy brat
Re: Photos of 1967 San Jose pinchweld blackout paint
« Reply #3 on: August 05, 2012, 08:18:28 PM »
Found the post to be very informative.

Thanks
Mach 1 428 cj "R" code 4spd. Royal Maroon. Built in San Jose 18 Feb, 1969.

Offline Bossbill

  • Hero Member
  • *****
  • Posts: 3283
  • In the middle of project hell
Re: Photos of 1967 San Jose pinchweld blackout paint
« Reply #4 on: October 18, 2017, 09:26:45 PM »
At what stage in assembly was the car when the blackout was applied?
I've seen assembly line pics of other year Mustangs where the engine was in before the fenders installed.
Since the blackout was applied before the front fenders that narrows things down a bit.

But, was the entire drivetrain and all other undercar components in at the blackout stage or was the black paint applied just after the color coat on the body was applied?

Without Jeff's excellent pics, I'm unsure.
Bill
Concours  Actual Ford Build 3/2/67 GT350 01375
Driven      6/6/70 0T02G160xxx Boss 302
Modified   5/18/65 5F09A728xxx Boss 347 Terminator-X 8-Stack
Race        65 2+2 Coupe conversion

Offline J_Speegle

  • Administrator
  • Hero Member
  • *****
  • Posts: 24623
Re: Photos of 1967 San Jose pinchweld blackout paint
« Reply #5 on: October 18, 2017, 10:48:58 PM »
At what stage in assembly was the car when the blackout was applied?

Believed to be at a station right after the engine compartment (and in the case of a San Jose or NJ c67) the front wheel well black paint application. For what ever reason the rear valance would have been brought into the body/quarter panel at the bottom edge and attached there before the pinch weld was painted. Believe the rest of the top edge mounting/attaching screws may have been added at that station also

But, was the entire drivetrain and all other undercar components in at the blackout stage or was the black paint applied just after the color coat on the body was applied?

Nothing was added to the car between the application of exterior and trunk paint application and the pinch weld black out process

Thanks for uncovering another dead link thread - fixed now with some of the same and some new examples
Jeff Speegle

Anything worth doing is worth doing concours ;)

Offline Bossbill

  • Hero Member
  • *****
  • Posts: 3283
  • In the middle of project hell
Re: Photos of 1967 San Jose pinchweld blackout paint
« Reply #6 on: October 19, 2017, 02:57:33 AM »
This is great stuff, Jeff.
The pictures, as always, are very useful.

I'm almost done removing the traction bars at the torque box. Mine were welded inside the spring cavity and take more than 4 hrs a side to remove properly.

Then the sealer and paint process begins!
Bill
Concours  Actual Ford Build 3/2/67 GT350 01375
Driven      6/6/70 0T02G160xxx Boss 302
Modified   5/18/65 5F09A728xxx Boss 347 Terminator-X 8-Stack
Race        65 2+2 Coupe conversion

Offline 67gtasanjose

  • Hero Member
  • *****
  • Posts: 5093
  • "Take the MUSTANG PLEDGE"
Re: Photos of 1967 San Jose pinchweld blackout paint
« Reply #7 on: October 19, 2017, 06:22:10 AM »
Thanks for uncovering another dead link thread - fixed now with some of the same and some new examples

I thought a couple of those looked EXTREMELY familiar  ;) At first, I looked at the reply date and noticed it was before I took mine apart (I did not notice the EDIT date). I have been reviewing these pics as well as all of mine lately A LOT and trying to determine correct timing, not so much for the topic in discussion yet (pinch weld blackout), but other things leading up to it, thing like "When was the brush-on sealer applied to the rocker panel seams and trunk drop off seams, including brush-on sealer around the seat belt plates, was this BEFORE or AFTER body color..."
(perhaps other threads on this, I will look)
Richard Urch

1967 (11/2/66, S.J.) GTA Luxury Coupe, 289-4V w/Thermactor Emissions, C-4, Int./Ext. Decor +many options

2005 (04/05) GT Premium Convertible, Windveil Blue, Parchment Top w/Med. Parchment interior,  Roush Body Appointments

Offline Bossbill

  • Hero Member
  • *****
  • Posts: 3283
  • In the middle of project hell
Re: Photos of 1967 San Jose pinchweld blackout paint
« Reply #8 on: October 19, 2017, 02:09:18 PM »
This pic:


shows color overspray onto the hard fuel line, rubber and bracket.
It doesn't show black over the color, although that could have worn off.
Did the owner say this car was original without a subsequent re-spray? Yeah, tough question.

Were the fuel line and other components installed prior to paint?

If so I need to install them prior to underbody color and blackout so they get the right amount of overspray.
Bill
Concours  Actual Ford Build 3/2/67 GT350 01375
Driven      6/6/70 0T02G160xxx Boss 302
Modified   5/18/65 5F09A728xxx Boss 347 Terminator-X 8-Stack
Race        65 2+2 Coupe conversion

Offline J_Speegle

  • Administrator
  • Hero Member
  • *****
  • Posts: 24623
Re: Photos of 1967 San Jose pinchweld blackout paint
« Reply #9 on: October 19, 2017, 03:52:39 PM »
shows color overspray onto the hard fuel line, rubber and bracket.
It doesn't show black over the color, although that could have worn off.

If you noticed the repsray/or touch up  (likely years later) was applied and coated the lower edge of the pinch but they took no effort to paint the bottom of the rocker The frame rail shows IMHO the respray over black pinch over the factory body color. Guess I should pick a better example from the files and replace this one . NOTE:  Picture replaced with one that doesn't have a respray


Were the fuel line and other components installed prior to paint?


No as mentioned earlier nothing installed other than doors, trunk lid, rear valance hung and rear bumper guard brackets

Here is the drivers side of and other example though someone has gotten under the car a bit and blasted some of the pinch weld black out away with some road grime with a high pressure washer. Glad they didn't do more or no telling what would have been left. ... but it would have been clean    ::)  Angle is odd and not great to show the difference of finish of the shadow left by the dolly. Its there just is dark like the surroundings but the difference in texture is noticeable

« Last Edit: October 19, 2017, 04:17:59 PM by J_Speegle »
Jeff Speegle

Anything worth doing is worth doing concours ;)

Offline J_Speegle

  • Administrator
  • Hero Member
  • *****
  • Posts: 24623
Re: Photos of 1967 San Jose pinchweld blackout paint
« Reply #10 on: October 19, 2017, 03:56:43 PM »
........... "When was the brush-on sealer applied to the rocker panel seams and trunk drop off seams, including brush-on sealer around the seat belt plates, was this BEFORE or AFTER body color..."

Find it difficult to tell for San Jose since (by now) most of the fine overspray that (if it did) reach the center of the floor pan is long gone or wipes away with the grit and road grime when you wipe it. The rocker sealant is protected in a shadow from the rocker lip so hard to get any body color over it or that area as is the trunk drop sealant. Good thing, as far as restorations go. In most cases the overspray and sealant in these locations don't overlap so the final look is fairly safe without any body color over the sealant IMHO
Jeff Speegle

Anything worth doing is worth doing concours ;)

Offline Bossbill

  • Hero Member
  • *****
  • Posts: 3283
  • In the middle of project hell
Re: Photos of 1967 San Jose pinchweld blackout paint
« Reply #11 on: October 19, 2017, 05:48:38 PM »
Thanks for the update, Jeff. That makes sense.

Ok, so if I have the process right, a guy is under the car with a cut down paint brush dipped in some kind of tar-like sealant.
He dips and then brushes the the floor pan to sill area wide or narrow depending on which way he holds the brush. Brush marks are clearly evident. He does both sides.
Depending on his mood he brushes the seat belt reinforcements making sure to do the front and both sides, sometime skipping the back.
He moves (or the car moves) and the torque box to sill area is next on both sides.
Finally as we get to the rear, he does the bottom of the trunk floor drop down with the same brush.

A bit later down the line the car gets painted.
The trunk drop down  may get some very misty whitish primer/color overspray that manages to get through the backup light hole and the sides of the not-screwed-down rear valance.

A bit later the valance is screwed on and the blackout is applied as noted here.
Bill
Concours  Actual Ford Build 3/2/67 GT350 01375
Driven      6/6/70 0T02G160xxx Boss 302
Modified   5/18/65 5F09A728xxx Boss 347 Terminator-X 8-Stack
Race        65 2+2 Coupe conversion

Offline J_Speegle

  • Administrator
  • Hero Member
  • *****
  • Posts: 24623
Re: Photos of 1967 San Jose pinchweld blackout paint
« Reply #12 on: October 19, 2017, 06:01:45 PM »
Ok, so if I have the process right, a guy is under the car with a cut down paint brush dipped in some kind of tar-like sealant.
He dips and then brushes the the floor pan to sill area wide or narrow depending on which way he holds the brush. Brush marks are clearly evident. He does both sides.


Most likely the sealant is applied with a gun or applicator then spread out. Assembly manual describes a solvent soaked rag was used to spread but I find that a short brush reproduces the look and is easier to control


Depending on his mood he brushes the seat belt reinforcements making sure to do the front and both sides, sometime skipping the back.
He moves (or the car moves) and the torque box to sill area is next on both sides.
Finally as we get to the rear, he does the bottom of the trunk floor drop down with the same brush.


Always on 67 San Jose have found the inner (front and back) seatbelt anchors sealed. sometimes all the way around sometime three sides
Yes on all your other observations

A bit later down the line the car gets painted.
The trunk drop down  may get some very misty whitish primer/color overspray that manages to get through the backup light hole and the sides of the not-screwed-down rear valance.

Allot of the paint passing through the back up light holes is applied directly onto the rear cross member that was unpainted on the. This cross member reduces allot of the overspray but yes there could be paint mist that traveled onto the rear frame rail, floor at the very back edge and the rear section of the trunk drops

A bit later the valance is screwed on and the blackout is applied as noted here.

Valance was in place just two screws holding it through the paint process- but yes the rest of the screws and being pulled into the body at the bottom corners was done prior to the pinchweld black application

Think you got it :)
Jeff Speegle

Anything worth doing is worth doing concours ;)