Author Topic: Assembly Line Dolly Marks  (Read 2138 times)

Offline ivygreen

  • Newbie
  • *
  • Posts: 19
Assembly Line Dolly Marks
« on: September 15, 2023, 05:42:11 AM »
Quick question as I get ready to paint the undercarriage of
My 1965. Was the bare chassis metal under all of the body dollies galvanized or only the floor support - or some other combination of galvanized and plain steel?

Thank you!

Offline Bob Gaines

  • Global Moderator
  • Hero Member
  • ****
  • Posts: 9332
Re: Assembly Line Dolly Marks
« Reply #1 on: September 15, 2023, 10:08:01 AM »
Quick question as I get ready to paint the undercarriage of
My 1965. Was the bare chassis metal under all of the body dollies galvanized or only the floor support - or some other combination of galvanized and plain steel?

Thank you!
Galvanized. Do not make the galvanized look super distinct . A subtle look is a more typical authentic appearance IMO.
Bob Gaines,Shelby enthusiast, Shelby collector , Shelby concours judge SAAC,MCA,Mid America Shelby

Offline ivygreen

  • Newbie
  • *
  • Posts: 19
Re: Assembly Line Dolly Marks
« Reply #2 on: September 15, 2023, 10:53:15 AM »
Thank you, Bob. I appreciate the help.

Offline Anghelrestorations

  • Hero Member
  • *****
  • Posts: 1189
    • Anghel Restorations
Re: Assembly Line Dolly Marks
« Reply #3 on: September 15, 2023, 01:17:06 PM »
This is what an unrestored dolly mark would look like.  Some are circular and some not so much depending on the contact with the mounting points.

2023-09-15_9-13-29 by Marcus Anghel, on Flickr
Marcus Anghel
MCA National Gold Card Judge, 69-71 Mustang
SAAC National Head Judge, Boss Mustangs

www.anghelrestorations.com
www.facebook.com/anghelrestorations
www.instagram.com/anghelrestorations

Offline carlite65

  • Global Moderator
  • Hero Member
  • ****
  • Posts: 2410
Re: Assembly Line Dolly Marks
« Reply #4 on: September 15, 2023, 04:09:11 PM »
it's nice to see someone paying attention to that minute detail. i have seen very few recreated properly.
5F09C331248

Offline J_Speegle

  • Administrator
  • Hero Member
  • *****
  • Posts: 24606
Re: Assembly Line Dolly Marks
« Reply #5 on: September 15, 2023, 06:05:56 PM »
Not sure of where your car was assembled but an additional detail is that the four visible "dolly marks" found on the interior and trunk areas (where the retainers passed through and were tightened to the dolly were bare untreated steel.
Jeff Speegle

Anything worth doing is worth doing concours ;)

Offline Anghelrestorations

  • Hero Member
  • *****
  • Posts: 1189
    • Anghel Restorations
Re: Assembly Line Dolly Marks
« Reply #6 on: September 16, 2023, 07:38:08 PM »
This is from the trunk area like Jeff mentions....

20230916_152951 by Marcus Anghel, on Flickr

20230916_152910 by Marcus Anghel, on Flickr

Marcus Anghel
MCA National Gold Card Judge, 69-71 Mustang
SAAC National Head Judge, Boss Mustangs

www.anghelrestorations.com
www.facebook.com/anghelrestorations
www.instagram.com/anghelrestorations

Offline J_Speegle

  • Administrator
  • Hero Member
  • *****
  • Posts: 24606
Re: Assembly Line Dolly Marks
« Reply #7 on: September 16, 2023, 08:18:42 PM »
This is what an unrestored dolly mark would look like.  Some are circular and some not so much depending on the contact with the mounting points.

2023-09-15_9-13-29 by Marcus Anghel, on Flickr

One thing to mention for those viewing this thread and pictures, the picture above with the double dolly marks is due to the fact that after 67 at some plants Cougars were also built and painted on the same line as the Mustang so the dolly's were modified for two rear mounting points (one for the shorter Mustang and one for the longer Cougar) so you will see two round shadows rather than one which would be correct for 65 Mustangs the focus of this section and thread. What the picture does is show nicely the galvanized surface of the exposed frame rail

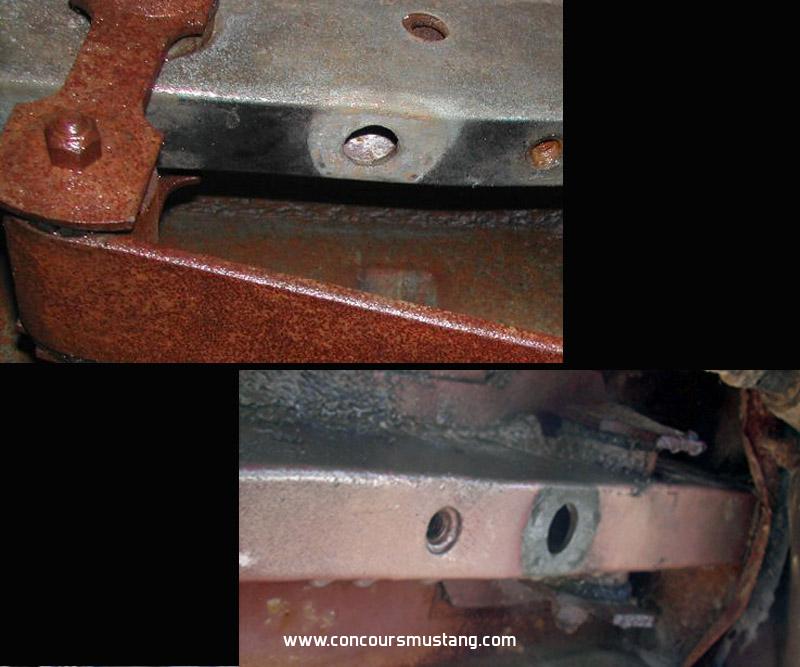
Some examples from 65 examples showing the single shadow.


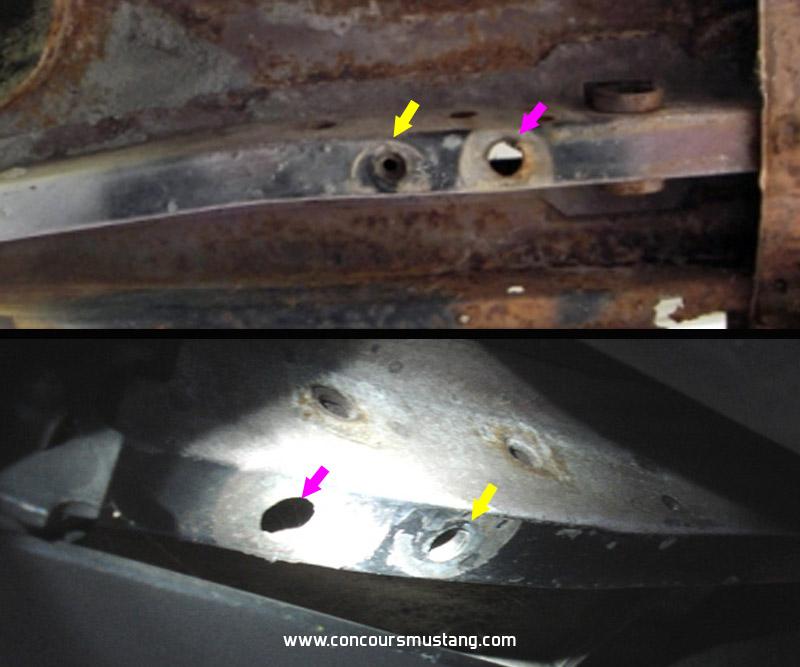
And just so there is not confusion these examples appear to be similar to the later double dolly marks but if you compare them these additional "circles" or "semi-circle" are in front of the dolly hole and produced by installing and removing the dual exhaust rear tie down originally installed on these two cars that use the nut insert in the rear frame section. Yellow arrow identifies the contact damage from the tie downs. On later cars (some plants) the "extra" dolly mark is just barely forward of the rear shackle location.


To round out the collection of pictures in this post here is a shot of a 65 trunk dolly mark while I'm posting

Jeff Speegle

Anything worth doing is worth doing concours ;)

Offline J_Speegle

  • Administrator
  • Hero Member
  • *****
  • Posts: 24606
Re: Assembly Line Dolly Marks
« Reply #8 on: September 18, 2023, 08:22:40 PM »
Article that explains the dolly shadows is available in the Library for your reading also. It includes some "stands" for replicating the look that I and others have used successfully

Jeff Speegle

Anything worth doing is worth doing concours ;)

Offline CharlesTurner

  • Charles Turner
  • Administrator
  • Hero Member
  • *****
  • Posts: 7685
Re: Assembly Line Dolly Marks
« Reply #9 on: September 19, 2023, 04:08:51 PM »
To replicate the spangle appearance of galvanized surfaces, I cut the eraser end of a new pencil into a small irregular triangle.  Spray silver paint over the frame rail area and then use a couple different shades of the same silver, using the eraser end to apply at different angles. 
Charles Turner - MCA/SAAC Judge
Concours Mustang Forum Admin

Offline Bob Gaines

  • Global Moderator
  • Hero Member
  • ****
  • Posts: 9332
Re: Assembly Line Dolly Marks
« Reply #10 on: September 19, 2023, 06:26:30 PM »
To replicate the spangle appearance of galvanized surfaces, I cut the eraser end of a new pencil into a small irregular triangle.  Spray silver paint over the frame rail area and then use a couple different shades of the same silver, using the eraser end to apply at different angles.
You can also get a convincing look by using hammertone silver paint in the spray can. Available at most larger hardware and big box stores.
Bob Gaines,Shelby enthusiast, Shelby collector , Shelby concours judge SAAC,MCA,Mid America Shelby

Offline J_Speegle

  • Administrator
  • Hero Member
  • *****
  • Posts: 24606
Re: Assembly Line Dolly Marks
« Reply #11 on: September 19, 2023, 06:36:08 PM »
Sine we're listing options to hopefully get to an acceptable original look :) I use the heavy clear freezer bag method or similar plastic over a dry silver base coat and a fresh wet coat of a darker silver pr light gray. On individual parts plated with galvanizing originally I zinc plate them first then add two layers of different silvers and grays
Jeff Speegle

Anything worth doing is worth doing concours ;)

Offline ivygreen

  • Newbie
  • *
  • Posts: 19
Re: Assembly Line Dolly Marks
« Reply #12 on: August 14, 2024, 08:42:22 PM »
Using the article on this topic, this is what I came up with. Pretty happy with the results.

Offline J_Speegle

  • Administrator
  • Hero Member
  • *****
  • Posts: 24606
Re: Assembly Line Dolly Marks
« Reply #13 on: August 14, 2024, 10:51:19 PM »
Using the article on this topic, this is what I came up with. Pretty happy with the results.

Looks good. Can make out a bit of the "horse shoe shadow" from the body color and pinchweld painting

For others, try and center the dolly holes with the wider washer or base circle. There was not much slop between and pin or retainer and the hole in the frame rails. Likely this is the cause of the slightly bent edge on one are of the punched circle when the workers move the few panels that made up the unibody at that point to try and center them on the pins to begin with
Jeff Speegle

Anything worth doing is worth doing concours ;)