Author Topic: Creating faux undercarriage paint drips  (Read 10904 times)

Offline Bossbill

  • Hero Member
  • *****
  • Posts: 3283
  • In the middle of project hell
Creating faux undercarriage paint drips
« on: December 29, 2017, 02:23:41 PM »
Somewhere I saw an article on how to replicate undercarriage floor paint drips using a hypodermic with a small sponge around the tip, sans needle, of course.
Maybe it was here -- maybe somewhere else.

I can't find it -- any help appreciated.
Bill
Concours  Actual Ford Build 3/2/67 GT350 01375
Driven      6/6/70 0T02G160xxx Boss 302
Modified   5/18/65 5F09A728xxx Boss 347 Terminator-X 8-Stack
Race        65 2+2 Coupe conversion

Offline J_Speegle

  • Administrator
  • Hero Member
  • *****
  • Posts: 24628
Re: Creating faux undercarriage paint drips
« Reply #1 on: December 29, 2017, 03:38:22 PM »
I recall at least one discussing the "faking" of the runs and drips on the undercarriage and the few pictures that accompanied the thread. Like you it may have been on another site but the search over there didn't turn anything up. If we discover it later we can always merge the two but its important enough to go over it again since there is a need.

Think Brent's posts of Jeremy's restoration of one of those cars may be the thread (linked) that we both may have been thinking of from a couple of years ago


I've not had to do it before (just went the "lots of paint route") but recall guys using rattle cans to focus on the low points, building the paint until it pooled and gathered then finally forming multiple drips as planned.  There are allot of these points so its going to take some time. A bunch of drips in one area while none in others is only going to look odd, inconsistent and unoriginal IMHO Also the body is going to need to be level and upside down.

The thin rattle cans will provide a very narrow pattern and you may need to come back and feather the edges away from the ribs once everything is dry so that the process is not obvious


Sure some others will have some additional experiences and thoughts to share
Jeff Speegle

Anything worth doing is worth doing concours ;)

Offline jwc66k

  • Hero Member
  • *****
  • Posts: 7346
Re: Creating faux undercarriage paint drips
« Reply #2 on: December 29, 2017, 04:54:13 PM »
A bunch of drips in one area while none in others is only going to look odd, inconsistent and unoriginal IMHO Also the body is going to need to be level and upside down.
Drips were not a desired characteristic. They occurred on the raised (downward) parts of the floor pan and mostly to the rear (caused by gravity and forced air drying?). There were a lot visible on the right side and very few on the left at the rear of the pan just before the upturn for the rear axle. They were all very solid, as in many years of drying. This was on a San Jose March 66 build.
Jim
I promise to be politically correct in all my posts to keep the BBBB from vociferating.

Offline Bossbill

  • Hero Member
  • *****
  • Posts: 3283
  • In the middle of project hell
Re: Creating faux undercarriage paint drips
« Reply #3 on: December 29, 2017, 07:08:41 PM »
I should add that the 67-68 MCA judging guide states on 5A "primer paint drips should be visible . . . "
Bill
Concours  Actual Ford Build 3/2/67 GT350 01375
Driven      6/6/70 0T02G160xxx Boss 302
Modified   5/18/65 5F09A728xxx Boss 347 Terminator-X 8-Stack
Race        65 2+2 Coupe conversion

Offline J_Speegle

  • Administrator
  • Hero Member
  • *****
  • Posts: 24628
Re: Creating faux undercarriage paint drips
« Reply #4 on: December 29, 2017, 08:04:52 PM »
I should add that the 67-68 MCA judging guide states on 5A "primer paint drips should be visible . . . "

Don't think that is important for the discussion ;)   It's IMHO more about what was original and how to replicate it.
Jeff Speegle

Anything worth doing is worth doing concours ;)

Offline 1969 Cale II

  • Full Member
  • ***
  • Posts: 241
Re: Creating faux undercarriage paint drips
« Reply #5 on: December 29, 2017, 08:30:59 PM »
Would it be hard to color match the "drip paint" to the underneath color? Like Jeff said, I and have done, wouldn't be easier to just repaint with a higher volume to make things equal? If you are going this far, the drips should have body color over spray on the outside of the drips. I did manage to get this on my car. But that be really anal. If your going to do it, try hard to do it right.

Offline Bossbill

  • Hero Member
  • *****
  • Posts: 3283
  • In the middle of project hell
Re: Creating faux undercarriage paint drips
« Reply #6 on: December 29, 2017, 11:26:50 PM »
Muscle Car Restorations in Chippewa Falls, Wisconsin was restoring a B9.

The primer/sealer floor drips looked just like the 67s. They explained that the drips weren't so much drips as "drips that exploded after going through the baking process."

That actually made a lot of sense since a lot of the drips I've seen actually look like craters, rather than drips. What I've been trying to replicate is this moon crater look.

This is the first I've heard of baking the red oxide, but it makes a lot of sense since it's impossible to assemble a car with a wet primer underbody.

Was the floorpan baked at the factory?
Bill
Concours  Actual Ford Build 3/2/67 GT350 01375
Driven      6/6/70 0T02G160xxx Boss 302
Modified   5/18/65 5F09A728xxx Boss 347 Terminator-X 8-Stack
Race        65 2+2 Coupe conversion

Offline J_Speegle

  • Administrator
  • Hero Member
  • *****
  • Posts: 24628
Re: Creating faux undercarriage paint drips
« Reply #7 on: December 30, 2017, 02:05:42 AM »
For 67 San Jose I'm not convinced that they are popped bubbles or collapsed drips or bubbles. Also not sure how air or fumes could have been produced inside a drip while not producing the same results in runs right next to these things. The reaction of the drips might be a result of exposure to heating lamps where the outer surface dried first then still not completely dry collapsed upward or the body was rolled causing this. IMHO knowing why isn't as important to us as how to reproduce the look on our restored cars though we do continue to try and find out how the process was done when possible.

Looking at San Jose examples I would report that maybe 40% of the drips produced these divots and in those cases 80-90% collapsed rather than what appears to be bursts shown on the 69 Dearborn example you have in the link. When they collapsed they didn't leave bare metal showing but sealed back up leaving often an odd multi-legged (for lack of a better term) pattern in the collapsed drip.


A few 67 San Jose examples - It should be noted that not all cars had as many drips or at the same location the pictures are provided only for discussion of the subject at hand

Passenger side front frame rail and outer floor pan
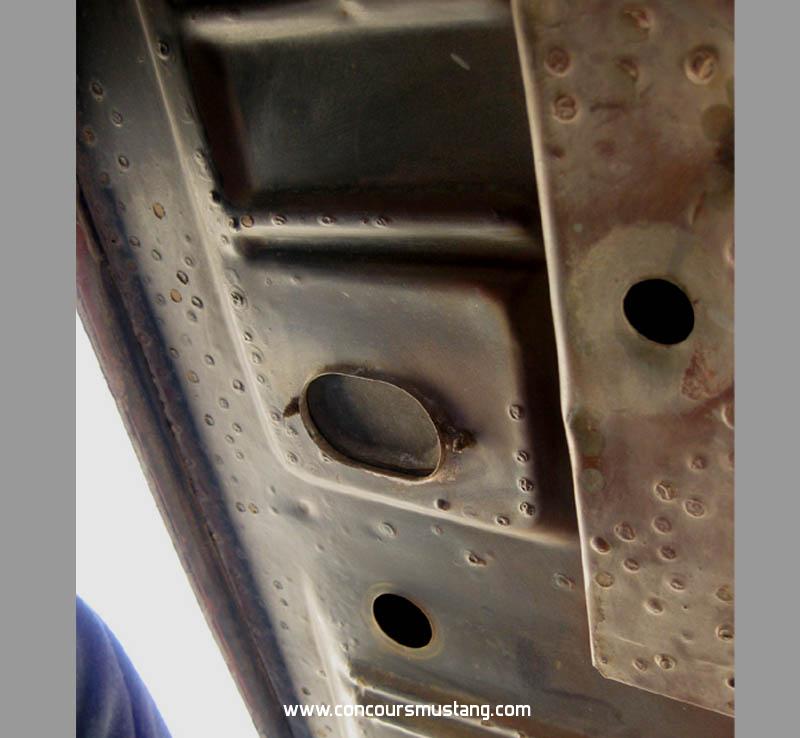


Typical drips collecting along the low points of the floor pan. In this example the ribs just behind a front seat
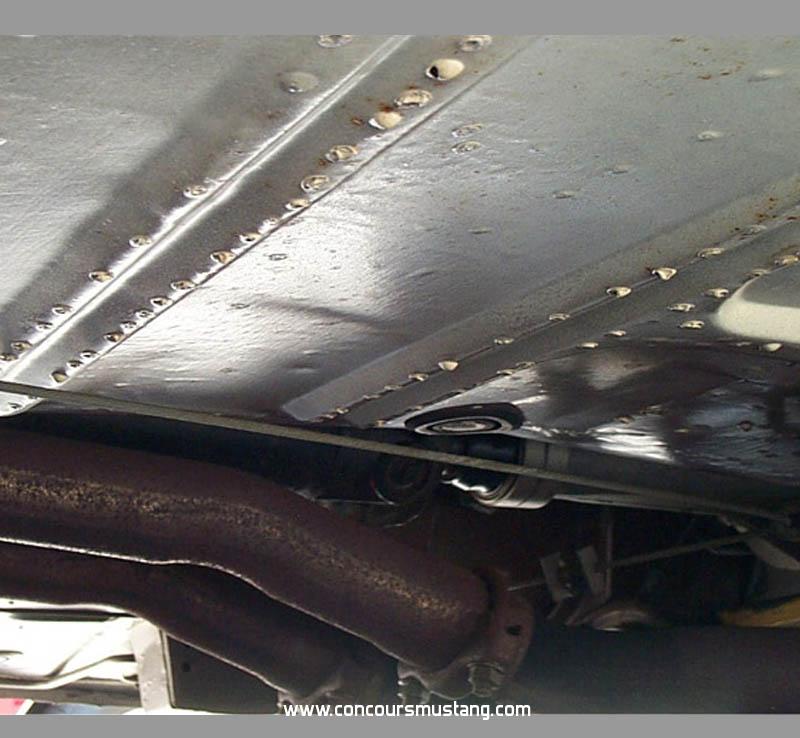


The rear floor under the rear seat riser. In this case the ribs are formed upward so the paint collected on the main floor surface here as well as runs on the seat riser panel since it is not perfectly flat
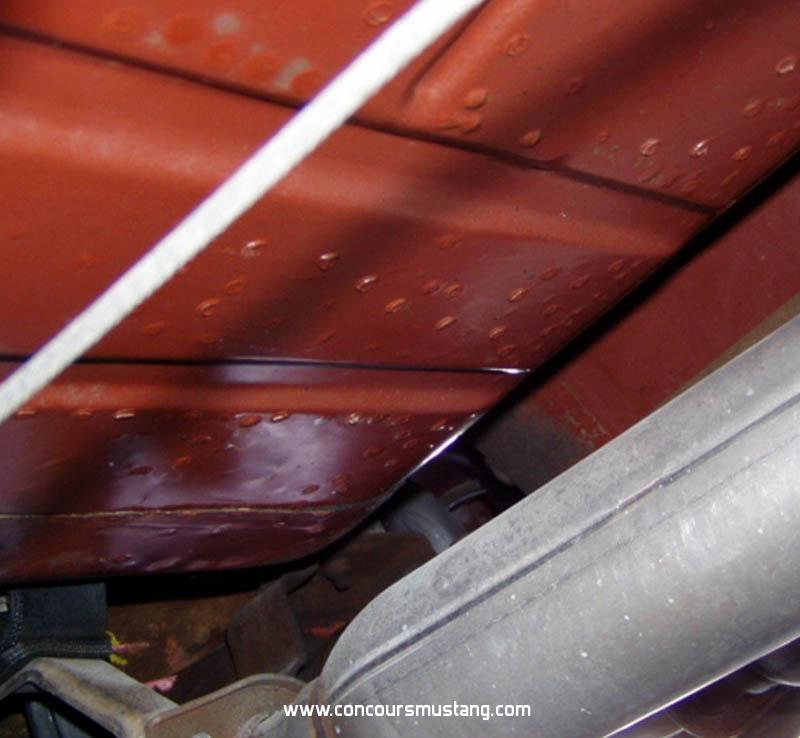


To the far right in the following picture you can see the runs that collected as the rear (under rear seat) flowed into the main floor section


Hope this helps.

And I haven't forgotten about your fastback trap door questions ;)
« Last Edit: December 30, 2017, 02:11:11 AM by J_Speegle »
Jeff Speegle

Anything worth doing is worth doing concours ;)

Offline Bossbill

  • Hero Member
  • *****
  • Posts: 3283
  • In the middle of project hell
Re: Creating faux undercarriage paint drips
« Reply #8 on: December 30, 2017, 09:14:42 AM »
It's always a losing game trying to explain one year's/one plant's methods to another's, isn't it?

I think it's solvent pop. The gif below explains.

Thanks again for the pics. I hope it helps others as well.
Back into the shop to experiment on spare sheet metal.
Bill
Concours  Actual Ford Build 3/2/67 GT350 01375
Driven      6/6/70 0T02G160xxx Boss 302
Modified   5/18/65 5F09A728xxx Boss 347 Terminator-X 8-Stack
Race        65 2+2 Coupe conversion

Offline Chris Thauberger

  • Jr. Member
  • **
  • Posts: 69
  • Quality is doing it right when no one is watching
Re: Creating faux undercarriage paint drips
« Reply #9 on: December 30, 2017, 11:04:32 AM »
...I think it's solvent pop...

No, definitely not solvent pop. Solvent pop appears more like small pimples.

Chris


Offline 67gtasanjose

  • Hero Member
  • *****
  • Posts: 5093
  • "Take the MUSTANG PLEDGE"
Re: Creating faux undercarriage paint drips
« Reply #10 on: December 30, 2017, 12:24:46 PM »
Hmmm...
This discussion is of huge interest to me. I have about 30-50% (maybe more) of the original drips and many are popped yet many are not. I also think a good number of the lower portions of the underbody, were scraped off in an accident I had when I landed the car really hard in the open deserts of the Mojave once...front frame rails were wiped clean (for instance) and some of the lower ribs were also wiped clean of the drips. I wouldn't mind putting back what would be typical.
Richard Urch

1967 (11/2/66, S.J.) GTA Luxury Coupe, 289-4V w/Thermactor Emissions, C-4, Int./Ext. Decor +many options

2005 (04/05) GT Premium Convertible, Windveil Blue, Parchment Top w/Med. Parchment interior,  Roush Body Appointments

Offline jwc66k

  • Hero Member
  • *****
  • Posts: 7346
Re: Creating faux undercarriage paint drips
« Reply #11 on: December 30, 2017, 12:52:04 PM »
- the drips weren't so much drips as "drips that exploded after going through the baking process."
That actually made a lot of sense since a lot of the drips I've seen actually look like craters, rather than drips.
Yes it does.
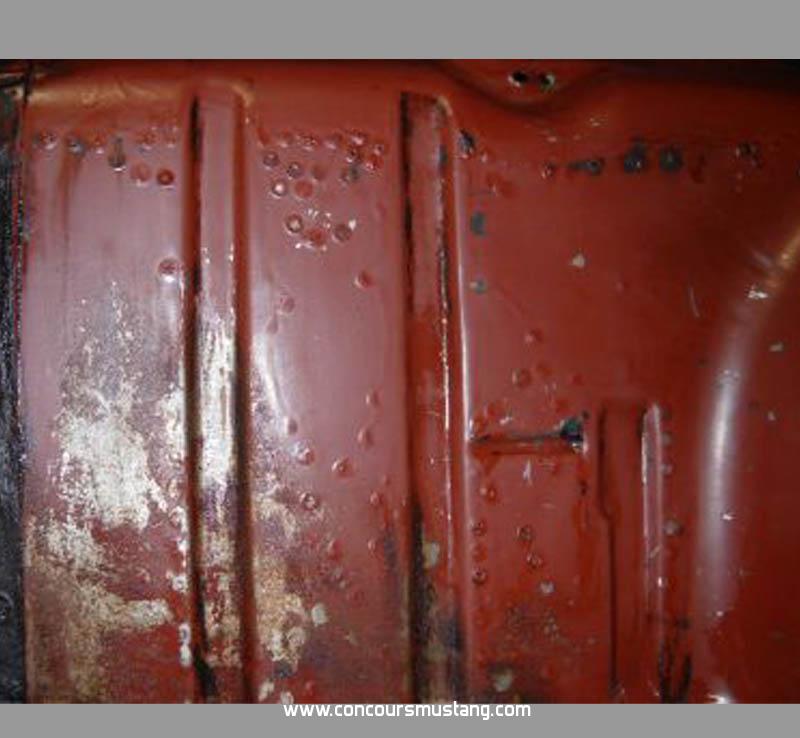
The undercarriage pictures are from a 66 GT Fastback I sold in 2005 (San Jose March 28 - sched). With the car on jack stands, I spent some time on my back cleaning. I made no attempt to remove any drips.
Jim
I promise to be politically correct in all my posts to keep the BBBB from vociferating.

Offline Bossbill

  • Hero Member
  • *****
  • Posts: 3283
  • In the middle of project hell
Re: Creating faux undercarriage paint drips
« Reply #12 on: December 30, 2017, 02:52:55 PM »
No, definitely not solvent pop. Solvent pop appears more like small pimples.

Chris

I agree that all of the recent paint threads seem to indicate that solvent pop is usually very small.

But finish paint is not slathered on with giant nozzles and baked on to speed drying while the car is moving (I think).
Plus, the car primer/sealer application is upside down and the paint is already dripping off.
I have no idea how long the bake cycle was on the underside (or even the top) but it had to be fairly hot to get the primer to dry in the mere minutes allowed.

So if it isn't solvent pop, then it's something else in the paint reacting to the heat and exploding. The other thing it could be is water. The later seems a bit unlikely. It could just be the extreme temperature to which the dripping paint is exposed. Which brings me back to the most volatile agent in the paint coming out quickly.

I'm open to suggestions as to how to replicate this effect regardless of how it was initially created.
Bill
Concours  Actual Ford Build 3/2/67 GT350 01375
Driven      6/6/70 0T02G160xxx Boss 302
Modified   5/18/65 5F09A728xxx Boss 347 Terminator-X 8-Stack
Race        65 2+2 Coupe conversion

Offline DKutz

  • Sr. Member
  • ****
  • Posts: 369
Re: Creating faux undercarriage paint drips
« Reply #13 on: December 30, 2017, 05:17:42 PM »
Seems like Virgina mustang, maple hill reproduced it in a recent Shelby.
1965 Mustang Fastback 'A' Code, silver Blue Met, Med blue int. Auto, San Jose, 10/8/64 #1449**

Gone but not forgotten - 1996 Mustang GT

Offline J_Speegle

  • Administrator
  • Hero Member
  • *****
  • Posts: 24628
Re: Creating faux undercarriage paint drips
« Reply #14 on: December 30, 2017, 06:03:06 PM »
Seems like Virgina mustang, maple hill reproduced it in a recent Shelby.

They may have just sprayed over the original surface (if its the car I'm thinking of) since it was doable on that car.
Jeff Speegle

Anything worth doing is worth doing concours ;)