Author Topic: Creating faux undercarriage paint drips  (Read 10891 times)

Offline J_Speegle

  • Administrator
  • Hero Member
  • *****
  • Posts: 24628
Re: Creating faux undercarriage paint drips
« Reply #15 on: December 30, 2017, 06:13:22 PM »
I'm open to suggestions as to how to replicate this effect regardless of how it was initially created.

Since we're just bench racing the idea lets me offer a couple of possibilities to start with and we can work though the good and bad points of each.

1- Do a base coat of primer to build up the product while the car is upright along one panel region to keep control and not let drying get ahead of us if we tried to do to large an area at one time.  Once the drips are set but not hard choice a random number to squish (if possible roll the car upside down) Given the size of the possible drips you would choose (the larger ones) you might use a wet pencil eraser since it has rounded edges and is approximately an acceptable size.  Might even experiment with cutting a pattern in the tip to produce those lines we see

Finish by feathering in the edges of the primer you used for the process

2-  Do the same process with just the floor color over the whole floor and frame (firewall rear ward or firewall forward) and depress a percentage of the drips. Problem I see with this methods is that the perfect time to do this will be very narrow and there is allot of area to cover but if you only do a couple dozen it might work.

Just some quick thoughts to get the discussion going. Wish I had the time to test out the possibilities on some of the floor panels laying around
Jeff Speegle

Anything worth doing is worth doing concours ;)

Offline DKutz

  • Sr. Member
  • ****
  • Posts: 369
Re: Creating faux undercarriage paint drips
« Reply #16 on: December 30, 2017, 08:19:36 PM »
1965 Mustang Fastback 'A' Code, silver Blue Met, Med blue int. Auto, San Jose, 10/8/64 #1449**

Gone but not forgotten - 1996 Mustang GT

Offline J_Speegle

  • Administrator
  • Hero Member
  • *****
  • Posts: 24628
Re: Creating faux undercarriage paint drips
« Reply #17 on: December 30, 2017, 08:34:03 PM »
Here is the car
http://blog.virginiaclassicmustang.com/search?q=Drips

Different car but that is the pictures I think Bill and I were thinking of in the first couple of posts. Thanks
Jeff Speegle

Anything worth doing is worth doing concours ;)

Offline 1969 Cale II

  • Full Member
  • ***
  • Posts: 241
Re: Creating faux undercarriage paint drips
« Reply #18 on: December 30, 2017, 09:07:40 PM »
I talked with people that worked at the Lorain Ohio plant that built my Cyclone, (Yes, from 1969). There was a guy in a pit that had to paint overhead to paint the bottoms of the cars and they had larger, more volume guns than we use to paint our cars. I used a 2 qt pressure pot to paint the bottom color on my Cyclone, that gun really puts out the paint and did a good job of runs and drips. Isn't just as simple as the drip drying out and shrinking back that causes the drip to look like that. From the vintage videos I have seen, the paint guns used in the auto industry are much higher volume than we have, the pattern is just huge. 3 passes and a panel is done. No HVLP gun I have used has that large of a pattern, nor would I want to. The learning curve on no runs might be tough.

Offline Bossbill

  • Hero Member
  • *****
  • Posts: 3283
  • In the middle of project hell
Re: Creating faux undercarriage paint drips
« Reply #19 on: December 31, 2017, 04:27:33 AM »
Thanks for the suggestions.
The Virginia Mustang car has the right flavor of pops, but a bit milder than some of the moon craters in other pics. But, perfectly satisfactory.
I've seen the videos of the painters slathering paint on -- that's an amazing amount of paint volume. I'll bet the undercar paint jets had some volume too.

I talked with my painter earlier this morning and he suggested about what Virginia did -- thinned epoxy primer -- but thought some localized heat might help. I'll try a few of these ideas in small scale and let you see some results in a few days.

If I could ever shake this lousy winter cold I might be able to get something done, so don't wait up.
Bill
Concours  Actual Ford Build 3/2/67 GT350 01375
Driven      6/6/70 0T02G160xxx Boss 302
Modified   5/18/65 5F09A728xxx Boss 347 Terminator-X 8-Stack
Race        65 2+2 Coupe conversion

Offline Mike_B_SVT

  • Sr. Member
  • ****
  • Posts: 389
Re: Creating faux undercarriage paint drips
« Reply #20 on: January 01, 2018, 02:00:13 AM »
I recall hearing from Adam at Mascar, that he would spray the underside with water before painting it in order to get drips that looked right.

I don't know if he had a layer of paint on it already, and then wet it and resprayed some more paint, or how exactly he did it.  But maybe you guys with experience will understand how that might work?
Mike B.

2003 Mustang Cobra Convertible
1 of 354 in Sonic Blue

1970 Cougar Eliminator (Competition Gold / Black Decor Interior), 428SCJ, Ram-Air, 4-speed w/ Hurst shifter
Built: Dearborn, Oct 6th, 1969
Cat Bites Man!

Offline Bossbill

  • Hero Member
  • *****
  • Posts: 3283
  • In the middle of project hell
Re: Creating faux undercarriage paint drips
« Reply #21 on: January 09, 2018, 08:11:04 PM »
It's been slow going with some sore back issues.

But I had a chance to red oxide a spare rear floor section and then begin some experimenting.

I haven't had time for the drips to fully harden yet and recoat with red oxide, so here they are without a recoat.
I've used different tools and processes to create this variety -- yes, some are failures -- and thought I'd post to gather opinions before I either paint or build up some more.

Although I have a rotisserie, I decided to make the "drips" while the car sat normally. So I situated the spare rear floor panel above my head in order replicate how I will eventually do this.

The three numbers represent three different tools to make the dots.
The horizontal line represents no heat applied above the line, and a pinpoint butane torch applied to the dots to make them explode below the line.
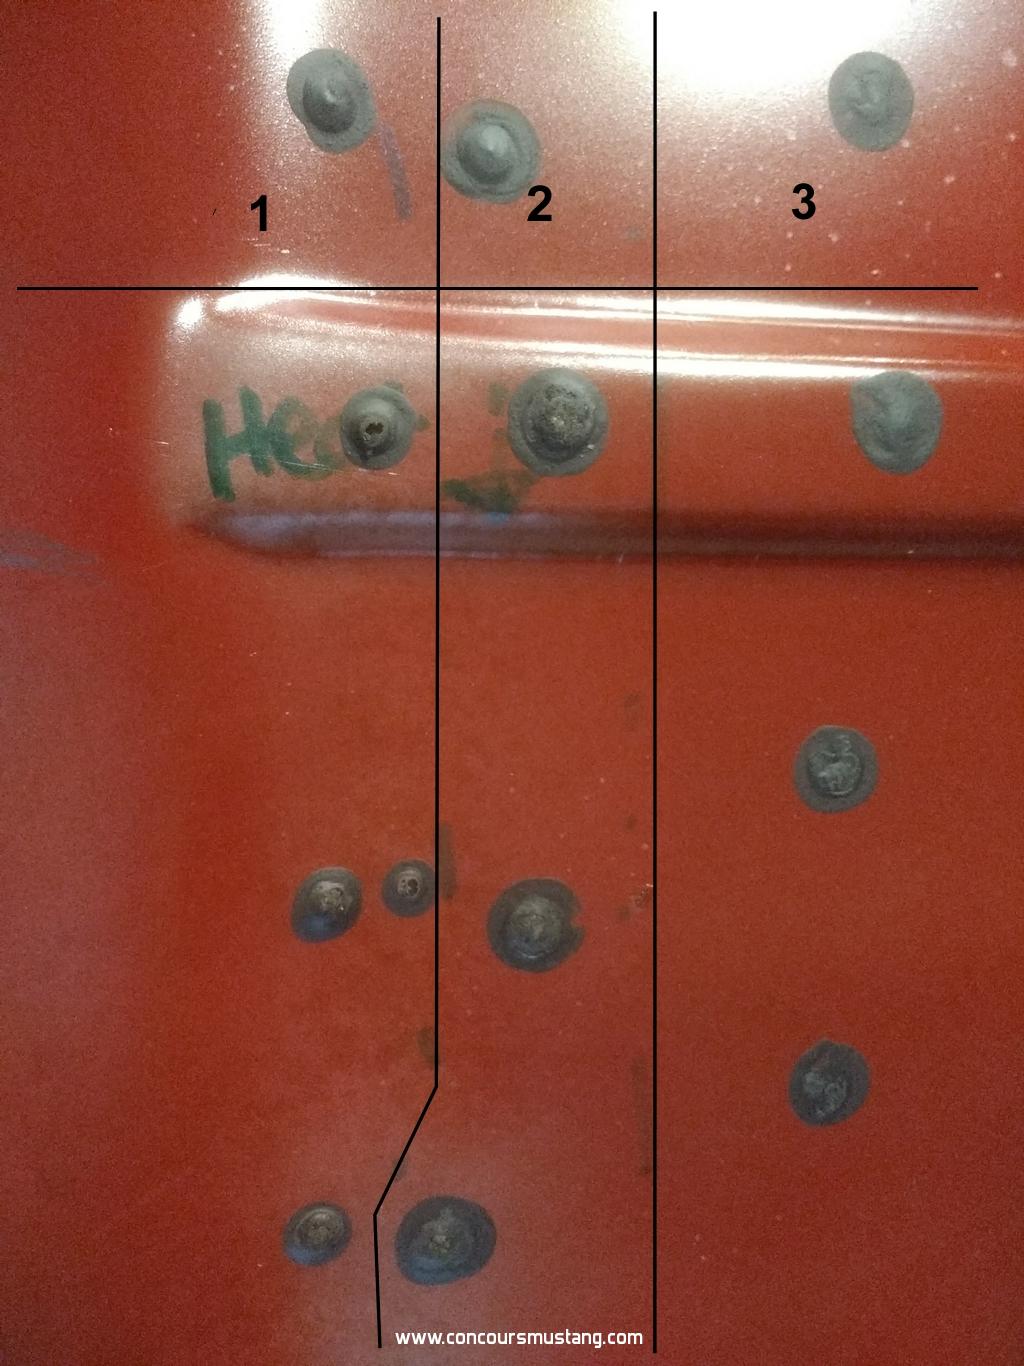

Bill
Concours  Actual Ford Build 3/2/67 GT350 01375
Driven      6/6/70 0T02G160xxx Boss 302
Modified   5/18/65 5F09A728xxx Boss 347 Terminator-X 8-Stack
Race        65 2+2 Coupe conversion

Offline Brant

  • Sr. Member
  • ****
  • Posts: 497
    • Virginia Classic Mustang Inc
Re: Creating faux undercarriage paint drips
« Reply #22 on: January 12, 2018, 08:57:40 PM »
Sorry, I just saw this thread.

The drips made on 6S033 were duplicated by Jeremy at Maple Hill Restoration. It's been something that he has been messing with for a while. We were always afraid that the drips may remain "soft", but they turned out to be very hard and durable, just like you see with the original ones.

The epoxy primer was just thinned down and sprayed at the right consistency to work. The drips/bubbles just kind of collapsed, and we were really pleased with the way it turned out.

The top coat colors were then put on and the correct "look" was still there.

Here are a few pictures:


Offline Bossbill

  • Hero Member
  • *****
  • Posts: 3283
  • In the middle of project hell
Re: Creating faux undercarriage paint drips
« Reply #23 on: February 07, 2018, 07:38:34 PM »
After having spent hours and hours on different processes and techniques, I think I have a method for creating faux drips. The best part is that I can choose where they go, and I can emulate the many different types of drips. I even have a process for the round circle drips!

It does rely on the car being on a rotisserie as the floor needs to face up. This process works best using gravity. I didn't want to spend even more time experimenting with more and more primer reduction on the real car -- and getting it wrong. I need to move on and this process should work for me.

Here is a pic where I used brown gloss paint to show the 'drips' as I didn't want to mix up DP. Ignore the lower left drip -- this was a test.
I think I'm on the right track ...


Bill
Concours  Actual Ford Build 3/2/67 GT350 01375
Driven      6/6/70 0T02G160xxx Boss 302
Modified   5/18/65 5F09A728xxx Boss 347 Terminator-X 8-Stack
Race        65 2+2 Coupe conversion

Offline Bossbill

  • Hero Member
  • *****
  • Posts: 3283
  • In the middle of project hell
Re: Creating faux undercarriage paint drips
« Reply #24 on: February 09, 2018, 11:10:03 PM »
Rotisserie assembled, car lifted and flipped.

Let the faux drip process begin!

Bill
Concours  Actual Ford Build 3/2/67 GT350 01375
Driven      6/6/70 0T02G160xxx Boss 302
Modified   5/18/65 5F09A728xxx Boss 347 Terminator-X 8-Stack
Race        65 2+2 Coupe conversion

Offline bryancobb

  • Silver Level Subscriber
  • Hero Member
  • ****
  • Posts: 1077
  • 2009 Ridn' Around
Re: Creating faux undercarriage paint drips
« Reply #25 on: February 17, 2018, 08:04:03 AM »
You Guys Crack Me Up ;D

The factories got these drips as a waste product of their paint process.  They achieved it unintentionally and it was created by unskilled, entry-level  undercarriage spray people who were even using "slop reclaimed paint" in some cases.  Because they were painting a generally unseen part of the car, their work was most likely not even inspected by QA. 

The most logical and easiest way to achieve factory-authentic results is to try and copy what was done at the plant.  The variables you will need to control are viscosity, temperature, volume deposited, smoothness of unpainted substrate, and rate of deposit.  Their guns probably sprayed near a gallon per minute.  Once the paint is in the belly and drips have formed, a large bed of heating element coils like a vacu-forming machine uses needs to be positioned about 12" beneath the floor and turned on to cure the floor at about 180-220 DegF.  This will boil the trapped solvent in the drips and make them POP like when cooking pancakes.  Smaller bubbles will pop differently than larger ones.  They will look different.  Really small bubbles will simply dry and harden without popping.

It won't be easy but it will be easier than "faking" them and getting an appearance that is less than optimum.  Once one person has success, their method will catch on like wild fire. :)

66 Metuch Conv
Nightmist, Std Blu Int
6T08C223904    76A       K         22       15c     21      6        6
                      BODY  COLOR   TRIM    DATE   DSO   AXLE  XMSN
   C/O  785                                   (rotation #)
   16    C14   6T08C223904        (weld bay 16, bucked MAR 14)

Offline Bossbill

  • Hero Member
  • *****
  • Posts: 3283
  • In the middle of project hell
Re: Creating faux undercarriage paint drips
« Reply #26 on: February 17, 2018, 08:05:01 PM »
I think everyone agrees this process involved fixed spray jets that hosed the primer on as the car went forward on a trolley.

After many hours of testing various paint mixes (a tremendous amount of reducer/solvent) I understand how much to put in the primer. I could also use a pressure pot and really slather this stuff on with the pot hooked up to my old Binks.

But I'm not interested in taping off that much of the shop in which I have the hoist. I'm also not interested in creating an oven under the car. Especially with all that solvent floating around.
I can paint my faux drips with a detail gun, not a sewer hose!

Like the wheel well undercoating process Jeff has created, which involves no tar based stuff of any kind, we are trying to duplicate what it looks like, not necessarily the way it was really done.
Bill
Concours  Actual Ford Build 3/2/67 GT350 01375
Driven      6/6/70 0T02G160xxx Boss 302
Modified   5/18/65 5F09A728xxx Boss 347 Terminator-X 8-Stack
Race        65 2+2 Coupe conversion

Offline CharlesTurner

  • Charles Turner
  • Administrator
  • Hero Member
  • *****
  • Posts: 7687
Re: Creating faux undercarriage paint drips
« Reply #27 on: February 17, 2018, 10:18:08 PM »
+1 on fixed spray jets.  They usually started with a line directly vertical from the edge of the firewall.  The idea being so paint wouldn't be wasted by blowing up through the engine bay.  The front frame rails from that edge forward were normally done by hand, so we don't see the same type of drips as the belly of the car.

This level of detail is what separates good restorations from great restorations!
Charles Turner - MCA/SAAC Judge
Concours Mustang Forum Admin

Offline CharlesTurner

  • Charles Turner
  • Administrator
  • Hero Member
  • *****
  • Posts: 7687
Re: Creating faux undercarriage paint drips
« Reply #28 on: February 17, 2018, 10:21:45 PM »
Hey Bryan... with a little patience, I believe the same forced heat method can be achieved with either large heat lamps or with a heat gun.  I like that mention of the bubbles popping.  Brant's car is a great example of the correct look.
Charles Turner - MCA/SAAC Judge
Concours Mustang Forum Admin

Offline J_Speegle

  • Administrator
  • Hero Member
  • *****
  • Posts: 24628
Re: Creating faux undercarriage paint drips
« Reply #29 on: February 18, 2018, 12:10:21 AM »
I think everyone agrees this process involved fixed spray jets that hosed the primer on as the car went forward on a trolley.

+2 :)  This is backed up with examples where jets apparently plugged up and left a strip of bare steel for a section of floor.  Those bare sections are often very straight - something we would not expect or find if the car had been done by hand front he firewall rearward.  We also have some examples were the jets (all fo them ) just stopped at one point across the whole undercarriage suggesting the some one hit or struck the leaver that made contact with the dolly/trolley at that point shutting the jets off. In those cases the section of bare floor was corrected/fixed by hand
Jeff Speegle

Anything worth doing is worth doing concours ;)