This may take a few post as your covering a fair amount of "ground to cover" in this request. I guess you have already looked at the unrestored area of the site and focused on the few sets of pictures that show the paint and sealant of 68 Dearborn cars. Also I suggest you read the 69 Dearborn undercarriage restoration article in the 69 section of the Library. Many of the steps you list below are covered there and the process is very similar.
....I do want to mention I know Grey slop primer would have been used but on this particular car there was much more red oxide showing on under carriage..(could have been resprayed at some point )
There are numerous periods at Dearborn during 68 production that applied (firewall rearward) red oxide and also dark gray version of batch. You didn't provide when your car was built so can't help out there
-Once car is stripped to bare metal i will complete all body work
-Red oxide prime the entire Car
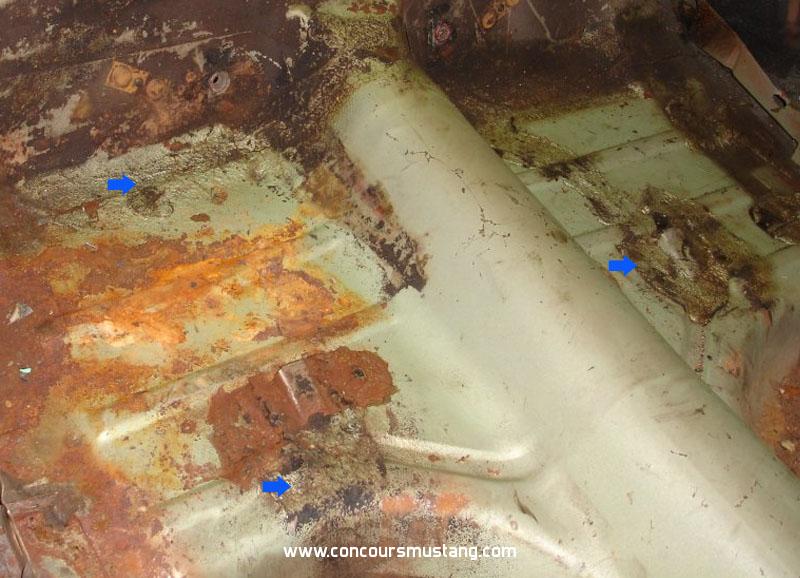
-Seam Seal and Sound Deadener Trunk Area
Many parts of the car were not primered so you will have to choose how you will handle these areas and how close to original looking your aiming to based on your needs and your local exposure issues
Hopefully your car still had the original seam sealant you can used as a guide. There were a number of different sealant types and applications depending
on which seam was being sealed
You'll need allot more seams sealed with different sealants. Examples roof rail, cowl edges, wheel well, interior and so on
-Paint Reachable areas of trunk area
Interior would have been painted first, followed by exterior painting of the jambs and trunk - followed by the exterior body. Of course by this time the doors, trunk lid, rear bumper guard brackets, rear valance (only upper mounting screws) installed, front fender upper rear bracket and quarter panel extensions (in this case loosely - slightly away from the body) installed
-Paint rear wheel wells
You have this and the following step reversed. Rear wheel well sealant and sound deadener applied before the car was painted exterior color. Likely same station or one next door to the trunk sound deadener application . remember that sound deadener did not end up only on the wheel well surface nor was exterior color limited to those surfaces only. They did not mask off the other surfaces facing outward do body color was applied to areas of the floor, frame, brackets that were attached to the car and overspray traveled further inward.
-Sound Deadener rear wheel wells after paint
See above. Body color and a little pinch weld black out over sound deadener in rear wheel well
-Paint Interior of car minus Roof Skin(leave Roof Red oxide)
As mentioned above Interior was painted first them areas masked and then exterior color was applied. Paint entered through openings after door jambs were painted. This produced direct application next to these surfaces (roof rail on the interior side and or rear package tray on a coupe for example) and overspray near the openings some times fading on vertical surfaces as they were located further inward or lower panels and the overspray was directed downward through openings or collecting as the paint traveled down ward
-Seam Seal interior of car with black seam sealer after paint
No interior seam sealant was applied before exterior paint was applied
-Paint Exterior of car (doors,trunk,rear valence, quarter panel extensions loosely on the car)Fenders,hood front valance valance off the car.
Some will do it this way. Often doing it this way leads to incorrect/unoriginal paint shadows and overspray patterns plus the extra step of having to paint mounting hardware or even mismatched exterior paint color or metallic patterns of your not careful on items that originally were painted along with the uni-body.
-Paint Engine bay
Yes engine compartment and radiator support was painted after body color. At times black was touched up with a brush at the rear end of the engine compartment (inner fender panels) just before they meet the cowl - often equal with the leading edge of the firewall to cowl pinch weld
-Assemble panels on to the car
Ok after additional sealants (mentioned below), drivetrain and brackets were installed
-Sound Deadner under front fenders area
After the car is completely done (may not have front wheels and tires in place) the front wheel well sound deadener was applied to try and seal out water into the interior of the car and deaden some of the road noise
Additional points/details worth mentioning
- Remember the pinch weld black out prior to the installation of any additional body panels. Direct and indirect spray onto the undercarriage low hanging surfaces, brackets, panels and features.
- After exterior color was applied the defroster dust surrounds on the top of the dash was blacked out.
- After paint sealant was applied in a number or areas on the undercarriage of the car
- After paint application additional openings were sealed before any additional sheet metal was installed. that sealed openings in the cowl side areas of the car.
- Front wheel wells were typically a mixture of body color (at the rear half) to red oxide (middle and sometimes more forward or rearward) and black from the application to the radiator support. or covering the paint gun test/bleed area sometimes found
This is all from memory and I may recall a few addition details and add them. - Hope it helps
Think I got them all. If I misunderstood or was not clear please re-ask again


