Author Topic: 1969 San Jose May build- Sealant, Deadener and Paint Process  (Read 1606 times)

Offline Bring Sally Up

  • Newbie
  • *
  • Posts: 26
1969 San Jose May build- Sealant, Deadener and Paint Process
« on: August 22, 2019, 01:13:01 PM »
Hi Guys
         I have read through all of the forums on when to apply sound deadener, seam sealers ,primer color based on factory and month of car, I just want to make sure I’m on the right track before going forward.
I’m working on a 1969 R code build May 6th out of the San Jose Plant. The car is currently in bare metal. Do the following steps look right ?

1-   Apply seam sealer (lord Fusor 804) to floor and trunk areas on to bare metal
2-   Apply Sound Deadener (Lord Fusor 805) to wheel wells and inner quarter panels
3-   Spray the trunk Area and floor with slop grey primer
4-   Spray the rest of the car with red oxide primer
5-   Paint the trunk and interior (candy apple red)
6-   Paint engine bay clip matte black
7-   Apply Sound Deadener on front clip area only once assembled or can I do that at the same time as I do the wells and inner quarters???


Thanks
« Last Edit: August 22, 2019, 05:41:05 PM by J_Speegle »

Offline J_Speegle

  • Administrator
  • Hero Member
  • *****
  • Posts: 24578
Re: 1969 San Jose May build- Sealant, Deadener and Paint Process
« Reply #1 on: August 22, 2019, 02:31:45 PM »
Before we start on the list. A couple of questions

Is this a Mach I or a sportsroof?

Once we get to the trunk, since they are all visible will need a list where you plan on applying the seam sealant. Its good to go over all the details so that it minimizes the chances of details falling between the cracks.

Did you take allot of pictures of the car before you started the process?

As you have possibly seen in other similar request the response should be pretty long once we get there.
« Last Edit: August 22, 2019, 05:41:14 PM by J_Speegle »
Jeff Speegle

Anything worth doing is worth doing concours ;)

Offline Bring Sally Up

  • Newbie
  • *
  • Posts: 26
Re: 1969 San Jose May build- Sealant, Deadener and Paint Process
« Reply #2 on: August 22, 2019, 03:08:15 PM »
Thanks Jeff , the car is a Mach 1 , Unfortunately a previous owner had started to strip the car so I did not get to take pictures of the car untouched, I am planning on seam sealing the trunk on all the areas that would have had it originally. Bottom of tail panel,wheel wells ,around bumper brackets ext
« Last Edit: August 22, 2019, 05:41:23 PM by J_Speegle »

Offline J_Speegle

  • Administrator
  • Hero Member
  • *****
  • Posts: 24578
Re: 1969 San Jose May build- Sealant, Deadener and Paint Process
« Reply #3 on: August 22, 2019, 04:44:39 PM »
Thanks Jeff , the car is a Mach 1 , Unfortunately a previous owner had started to strip the car so I did not get to take pictures of the car untouched, I am planning on seam sealing the trunk on all the areas that would have had it originally. Bottom of tail panel,wheel wells ,around bumper brackets ext

Add to your list (just to make sure)
- forward floor to side floor seams
- wide floor panels to rear trunk panel below taillight panel seams
- spare tire hold down bracket.
« Last Edit: August 22, 2019, 05:41:34 PM by J_Speegle »
Jeff Speegle

Anything worth doing is worth doing concours ;)

Offline Bring Sally Up

  • Newbie
  • *
  • Posts: 26
Re: 1969 San Jose May build- Sealant, Deadener and Paint Process
« Reply #4 on: August 22, 2019, 05:05:25 PM »
Got it. Thanks. I’ll post pics once complete.
« Last Edit: August 22, 2019, 05:41:43 PM by J_Speegle »

Offline J_Speegle

  • Administrator
  • Hero Member
  • *****
  • Posts: 24578
Re: 1969 San Jose May build- Sealant, Deadener and Paint Process
« Reply #5 on: August 22, 2019, 05:40:11 PM »
Oh lots more :) Hopefully I recalled everything

1969 Mach I build May 6th out of the San Jose Plant.

1-   Apply seam sealer (lord Fusor 804) to floor and trunk areas on to bare metal

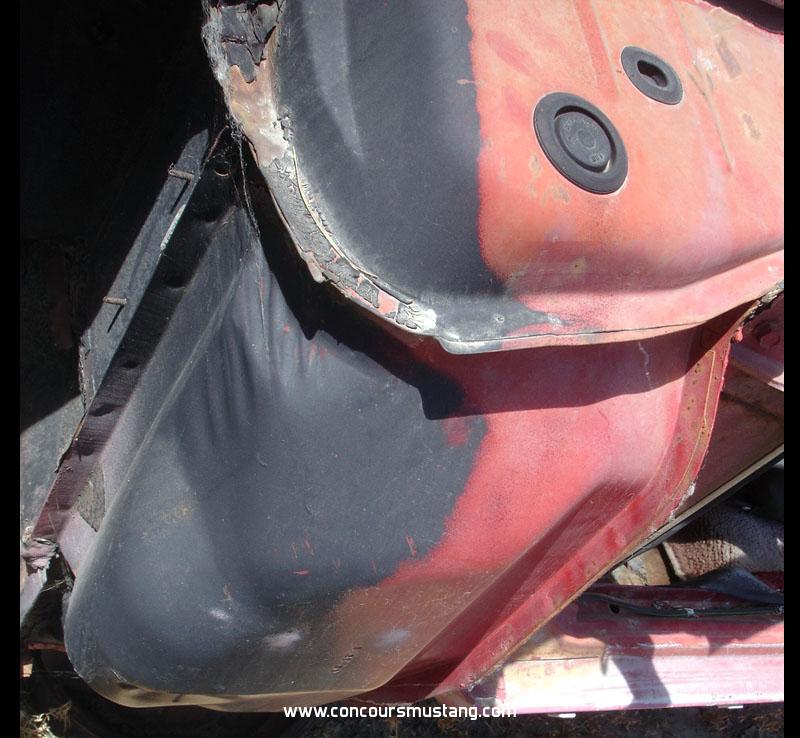
2-   Apply Sound Deadener (Lord Fusor 805) to rear wheel wells and inner quarter panels. Rear wheel well application should include sections of the outwardly facing frame rail and floor surfaces included in a logical pattern from making multiple passes with the application gun/wand from slightly outward and upward application. Product applied from below the car not directly from the side which is what we see on many "restored" cars.

3-  Install what ever your using to reproduce the dolly marks at this point. 

4-  Bottom of the windshield opening, where the defroster vent holes are, from A pillar to A pillar blacked out and masked off.

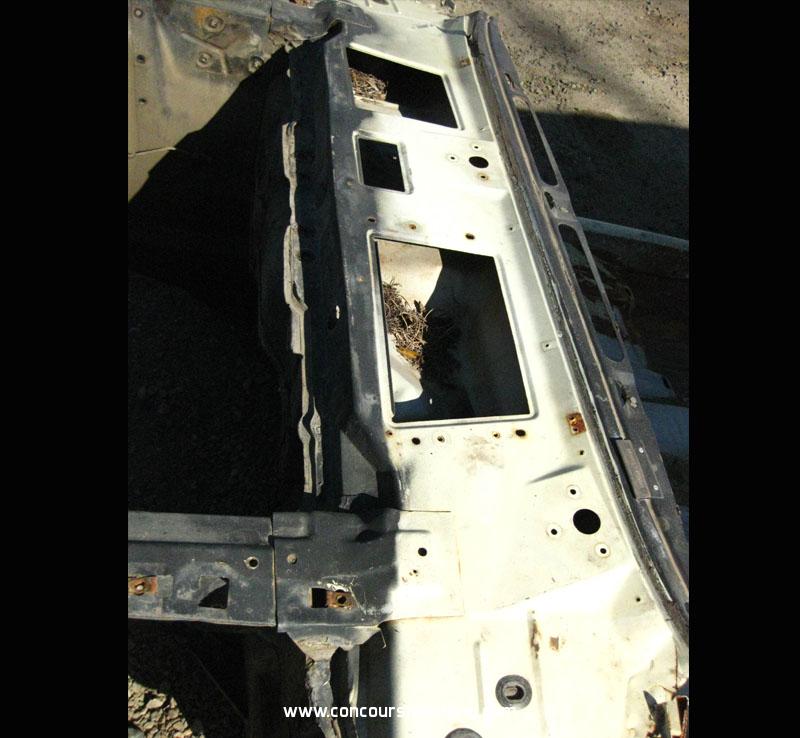
5-  Spray the trunk Area and floor from approx firewall to just short of rear cross member) with slop grey paint/sealer mixture

6-  Spray front frame rails, brackets and front wheel wells with red oxide primer sealer

7-  Spray the rest of the car with red oxide primer. Trunk lid, doors were installed prior to this step

8-  Exterior sprayed with light grey primer surfacer. After this step rear valance (attached with two screws only left hanging) and end caps (quarter panel extensions) loosely installed (spaced out slightly) with one attaching nut were attached.

9-   Paint the trunk (candy apple red) Then door jambs and exterior main body.  This includes rear wheel well - as well as visible frame and other panels visible in wheel well Direct and indirect paint application into the interior area of the car was a by product of the other applications

10-   Paint engine bay clip matte black including the wheel wells (from  approx 10" behind rear splash guard mounting location on drivers side to the same basic spot on the passenger guard location including face of radiator support.  Black continues up and over to just under where the cowl cover will be attached.

11- In the interior rear - base of rear window opening the area around the defroster hole is blacked out over body color.

12- Install everything that passes through the firewall or connects to the forward surface (brake lines, master cylinder/booster electrical, heater or AC - etc) then apply sealant over each point or area. Application is typically with a applicator flowing all the time from start to finish so more of a solid pattern from one point to another.

13- Apply the remaining seam sealer to the floor of the car. Rocker to floor seam, trunk drop to quarter panel pinch weld and at the inner seat belt anchors. All applied with a chalking gun or similar tool then brushed with rag or short bristle brush

14- Rear valance pulled into to the body and rest of the remaining hardware installed.

15- Pinch weld black out applied from front wheel well to rear valance over body color in the rear wheel well at front and rear edges

16- Apply Sound Deadener to the main floor of the vehicle. Typically three passes one down the center covering the driveline tunnel and a little more sideways from approx rear of transmission  to somewhere under the rear seat cushion rise. *Driveline and exhaust not yet installed. Floor panel plugs, E brake cables and brackets, brake and fuel lines all installed. Second and third passes sprayed while standing towards the center of the vehicle, moving reward, from front  frame rail beginning to floor to, typically, rear edge of rear seat cushion riser where it rises to the over the rearend area. All surfaces are approximates since each one varied some. Try to do this in one pass (may be difficult with certain products. Multiple passes will not normally reproduce the sharp original like shadows from brackets, frame rails or cables in the area
 
17- Apply Sound Deadener in the front wheel wells once all parts are installed (fenders, wiring, brakes ...)  so that overspray or direct spray goes over hardware and installed parts if they are in the application area.

- Individual body parts would have been painted off the car with headlight buckets getting black out at the high beam bucket area.

Some pictures to illustrate just some of the details listed above. You may have seen some in other threads
I anticipate some follow up questions for clarity


Hope this helps


« Last Edit: August 22, 2019, 05:42:20 PM by J_Speegle »
Jeff Speegle

Anything worth doing is worth doing concours ;)

Offline Bring Sally Up

  • Newbie
  • *
  • Posts: 26
Re: 1969 San Jose May build- Sealant, Deadener and Paint Process
« Reply #6 on: August 23, 2019, 11:23:59 PM »
Wow. Thank you so much for the write up. This helps me out big time !  I’ll let you know if I have any questions but I think I’m picking up what your laying down. Thanks again!

Offline rockhouse66

  • Hero Member
  • *****
  • Posts: 944
Re: 1969 San Jose May build- Sealant, Deadener and Paint Process
« Reply #7 on: August 24, 2019, 08:54:05 AM »
My 3/69 San Jose car had a lot of coverage of the sound deadener underneath.  Also, I don't see it mentioned in Jeff's list, but there is blackout behind the kick panels so you don't see body color through the vents.

Jim
'66 GT FB

Offline J_Speegle

  • Administrator
  • Hero Member
  • *****
  • Posts: 24578
Re: 1969 San Jose May build- Sealant, Deadener and Paint Process
« Reply #8 on: August 24, 2019, 04:39:33 PM »
Thanks Jim . Lots of details and I was sure to miss one the first time through
Jeff Speegle

Anything worth doing is worth doing concours ;)