Author Topic: 69 GT350 Sportroof restoration thread - Mostly Body & Paint - Lots of pictures  (Read 16556 times)

Offline J_Speegle

  • Administrator
  • Hero Member
  • *****
  • Posts: 24620
This is a thread originally posted on another forum. 

Car is a early May 69 build AC, automatic, Jade Black, white interior, ex Hertz rent a car (yes Shelby/Ford sold these to Hertz after 66)

Enjoy

Just thought I would post these and may continue as the process continues.

Car - (mid spring) 69 GT350 being restored at the Resto-Mod Shop in Stockton CA (close by)

I'm babysitting the job so there is a learning curve on this first ground up attempt by this shop.

+++++++++++++++++++++++++++++++++++++++++

They shot the undercarriage with the first color last week (hard to get good pictures under the car right now)
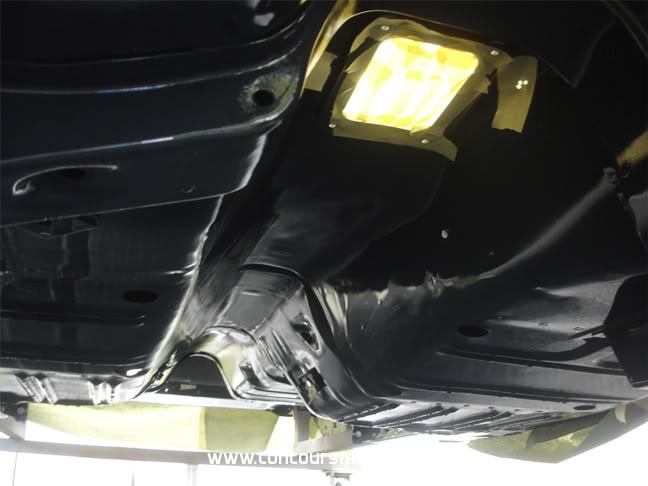

Picture of the color used on the floor pans - This will get covered with body color (for this plant and time period)during a later step. Fairly typical dark gray batch color
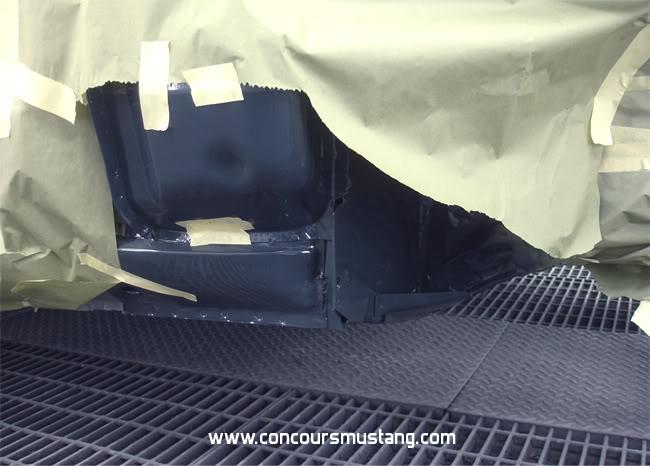


+++++++++++++++++++++++++++++++++++++++++
Here the car is being masked off today as the seam sealer is being applied to the trunk and interior areas so that they can paint the interior and trunk areas - as soon as they get the texture right on the sealer.
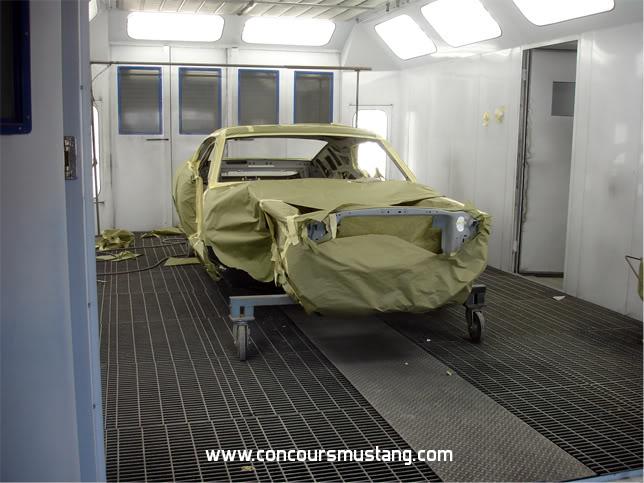


+++++++++++++++++++++++++++++++++++++++++
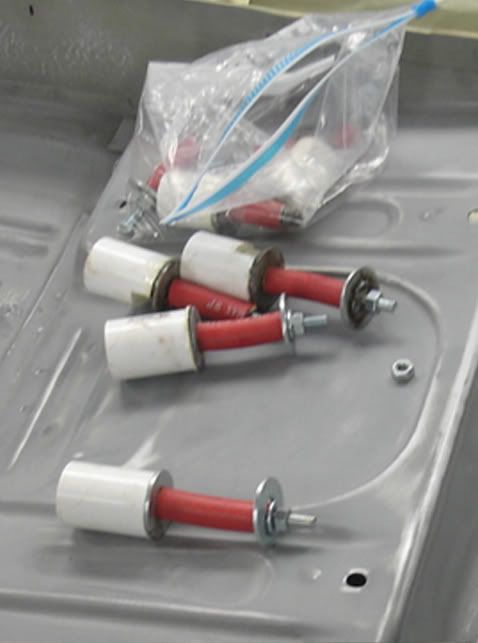
Below are the dolly mark tools I built for this car... we'll see how they work.

Two pairs are for the blind holes and can be inserted and anchored from one end while the others bolt through the bottom to top to replicate what the factory did.

Did find that 69-70 Dearborn SOMETIMES used larger upper washers on the four through points than San Jose.  Will post an article covering how to make these and how to use them.
 

[color:blue]Just though I would share[/color]

Are the pictures kind of small or is it just my monitor settings ?   :shrug:
« Last Edit: July 14, 2017, 05:29:25 PM by J_Speegle »
Jeff Speegle

Anything worth doing is worth doing concours ;)

Offline J_Speegle

  • Administrator
  • Hero Member
  • *****
  • Posts: 24620
This week it was sound deadener and seam sealer. Trying some new stuff - still need to over coat if for the final look. Pretty happy so far, finally found something that will build to the thickness I want.

Found that an acoustic product made my Spectrum worked very well at reproducing the original look of the spray on seam sealer and sound deadener. You can built it to at least 1/4" thick and it will sag like the original. Be aware that as always it take technique and product to produce the desired effect - so practice first

Maybe some color next week ;)


« Last Edit: July 14, 2017, 05:33:09 PM by J_Speegle »
Jeff Speegle

Anything worth doing is worth doing concours ;)

Offline J_Speegle

  • Administrator
  • Hero Member
  • *****
  • Posts: 24620
So far undercarriage, interior (with trunk) and body  has been painted. Exterior color is Jade black (red oxide appears redder in the pictures than it does in real life)


Today - body color being applied over the front cowl/wheelwell areas onto the inner fender panel and over the read oxide that was applied to the front clip area.


Engine compartment was shot next with semi-gloss black. All inner engine compartment walls and brackets, fading down the firewall, front of the radiator support and over the front section of the  inner fender panels leaving an area between the black and the body color showing the red oxide below.


The finished Dearborn style front wheelwell. Of course there are original examples where the body color was more forward or rearward and the same for the wheel well black more or less red oxide showing (wish the exterior color was a lighter color for more contrast ;)


« Last Edit: July 14, 2017, 05:36:48 PM by J_Speegle »
Jeff Speegle

Anything worth doing is worth doing concours ;)

Offline J_Speegle

  • Administrator
  • Hero Member
  • *****
  • Posts: 24620
Front fenders are just about done (front side needs to be "blacked/grayed out" in the headlight and grill side areas) Here they are out of the booth.

Original part number on one of the fenders


Overall look of the fender showing the bonding agent used to attach the front support and the upper and lower sections together.  NOTE: For some reason the bonding agent and the flat attachment bracket appear much lighter on my monitor than in person. Color is a very dark gray to black


Overspray shadow from the rear edge


Body color overspray on the headlight bucket area (light pink is the color that piece was originally molded in)


« Last Edit: July 14, 2017, 05:40:16 PM by J_Speegle »
Jeff Speegle

Anything worth doing is worth doing concours ;)

Offline J_Speegle

  • Administrator
  • Hero Member
  • *****
  • Posts: 24620
PROJECT: Refinishing 68-70 Fiberglass Taillight Assemblies

To see the complete article with step by step instructions - click the link below for pdf
68-70 Taillight Assembly Article.pdf
[/size]

TIME: Approx 1 hr for each task illustrated in the article

SUPPLIES:

See attached Article for specific suggestions


+++++++++++++++++++++++++++++++++++++++++++++++++++++++++++

Was recently faced with the task of refinishing a fiberglass taillight panel from a 69 Shelby. These are basically the same as 68 California Specials as well as 68 Shelby's.


First task was reapplying the black edge to the taillight lens. In examining original example it appears that the edges were blackout. Guessing that some engineer worried that the light could exist out between the taillight frame and taillight panel so the surface received the coating to reduce the possibility.


++++++++++++++++++++++++++++++++++++++++++++++++++++

Second, to refinish the back reflective surface of the taillight housings. These surfaces had become chalky and rough since new so my task was pretty straight forward.

Basically just sand the rear surface of the reflector section of the taillight panel,  then apply a couple of nice smooth coats of Aervoe Chrome Galvanized spray paint. The pictures give a general idea of how well the paint reflects for a rattle can. Another option would be to over coat this paint with Kryon reflective spray paint in the can. Used that when restoring the back up lights (another post/Article)


++++++++++++++++++++++++++++++++++++++++++++++++++++

While reassembling the taillight panel I discovered that a number of thread inserts that originally were molded into the taillight panel (to screw the taillight frame screws into) were missing. Unfortunately I did not disassemble the car or I might have found this earlier.

When searching for some fix I found some brass thread inserts that are used in cabinet making. Pretty inexpensive and perfect for this job.


++++++++++++++++++++++++++++++++++++++++++++++++++++

All finished


Taillight panel all finished and ready to attach to the car when its ready


As in the other posts - view the attached article for more information and pictures.
« Last Edit: December 04, 2017, 02:25:31 AM by J_Speegle »
Jeff Speegle

Anything worth doing is worth doing concours ;)

Offline J_Speegle

  • Administrator
  • Hero Member
  • *****
  • Posts: 24620
Haven't added anything for a while - so here is a little.

Doors have been completed (glass and all inside) and adjusted to the body so time for weatherstriping.

We used one of the reproductions considering the class we're planning on showing the car in.


Product we're using for gluing the stuff in place is shown below. Hercos - and aggressive, fast adhesive when compared to 3M as the like, that spreads by brush.   We removed the brush attached to the cap as suggested by another forum member since it appears that it can rust in the can and alter the color of the adhesive from the original yellow/amber to a much darker rusty color :(

Another point to mention - if you purchase this stuff buy it in small containers and make sure it is really sealed after every use. It can harden in the an if not careful - don't ask me how I know.


A good place to start is with a couple of examples of originals. Not all applications were this sloppy but we've all seen pretty and perfect installations.  Not all were this messy but a fair number were


We used a cheap 1/2" brush to apply the adhesive to the surfaces. First we applied the glue to the door to duplicate the original brushed on style. This will provide some overage that will be seen once the weather strip is in place - like the original cars we have found.  It will also make it easy for the judges to confirm the color were used in the application - a detail spelled out currently on the Judging Sheets


A second coat and the weatherstrip is installed. No holding it in place with masking tape , as mentioned it will adhere quickly. Work a section at a time and things should work out just fine.


We let it dry a couple of hours to make sure then closed the doors.


« Last Edit: July 14, 2017, 05:47:53 PM by J_Speegle »
Jeff Speegle

Anything worth doing is worth doing concours ;)

Offline J_Speegle

  • Administrator
  • Hero Member
  • *****
  • Posts: 24620
Been a while and we're slowly closing in on the finish. As always plenty of new details being uncovered and things that could be adjusted just a little better ;)

Owner built a stand to  test fit then assemble the completed front end on. In this way we will be duplicating what was done at AO Smith where the front ends were painted,  preassembled  and finally installed as a subassembly.

Dan built it with an up sweep so that the fitting of the forward panels and grill would be easier


After everything is fitted the grill and headlight areas will be masked off (top and bottom grill bars will be shot first off the car) and painted the dark gray. Then the back side of the valance will be masked off (no tape to the rear or sides - just the lip) and shot semi-gloss black


We've also been playing with a couple of sets of original lace for the rear and have found a couple of variations. Will try and put some comparison pictures together for another post
« Last Edit: July 14, 2017, 05:48:51 PM by J_Speegle »
Jeff Speegle

Anything worth doing is worth doing concours ;)

Offline J_Speegle

  • Administrator
  • Hero Member
  • *****
  • Posts: 24620
Been a little slow but I think we've reached a point where some of the finish work will be getting done in anticipation of the MCA Washington state show and the SAAC Nationals

Received a new small block 69 exhaust system last week. Scott Fuller just started making these systems, believe we got the second complete set. We had him incorporate a NOS muffler we purchased for the car. Got it unpackaged and cleaned off as instructed. Looks great

Just the new H pipe - more pictures to come

« Last Edit: July 14, 2017, 05:49:36 PM by J_Speegle »
Jeff Speegle

Anything worth doing is worth doing concours ;)

Offline J_Speegle

  • Administrator
  • Hero Member
  • *****
  • Posts: 24620
Been a while but shows are getting close so we're wrapping stuff up.

After allot of test fitting, measuring and the lot the front end was rolled into the booth and the grill, headlight area and details was sprayed


The rest of the bright work and such was installed


And the front end installed as a unit (as it was done originally). With the tires removed it went quickly into place


Items such as splash shields (galvanized splash shield support shown below) and all the brackets will be installed as well as the front bumper this week)


Just a few things to get it ready
« Last Edit: July 14, 2017, 05:52:16 PM by J_Speegle »
Jeff Speegle

Anything worth doing is worth doing concours ;)

Offline 69grandecj

  • Newbie
  • *
  • Posts: 47
Looks like it will be ready for the GN in Washington.
MCA # 24108
MCA Gold Card Judge 3rd Generation
MCA Certified Judge 69-70
1969 Mustang Grande 428 CJ
1969 Mustang SportsRoof
1989 Mustang GT Convertible 22K miles

Offline mach514

  • Silver Level Subscriber
  • Newbie
  • ****
  • Posts: 24
the pictures are amazing, but the car is even more beautiful in person. Jeff's really gone over the top on the attention to the details. I'm pretty sure were going to make it!!!

Offline J_Speegle

  • Administrator
  • Hero Member
  • *****
  • Posts: 24620
A few friends have mentioned that many of us with threads or blogs showing restorations forget to show at least a few pictures of the completed car or any form of a "wrap up"

To that end I offer the following

9F02M481897 was completed in time for it to be shown at its first show (the 2010 MCA Seattle meet). This show was important in that it allowed a number of well know judges and friends the opportunity to "tear the car apart"  and offer some finer points before the SAAC show


They found a couple of fit issues, a couple of screws they didn't like, slightly worn finishes on a couple of items, not enough grease on the door hinges, lack of nice clean machined surfaces on the master cylinder as well as a missing nylon tie. Incorrect gas cap markings and a couple of other item were also noted. Of course this gave the owner and I a couple of things (of which we did) in the period between the shows

Car was then judged in Division II at the annual SAAC convention - this year (2010) held in California (lucky for us)

At both shows the car was awarded a Gold in its class. I should take this opportunity to thank all that had a hand in making this car such a nice car  - I thank each and everyone of you for your comments. experience and help.


Good luck to all with your projects - now on the then next one for me ;)
« Last Edit: July 14, 2017, 05:53:19 PM by J_Speegle »
Jeff Speegle

Anything worth doing is worth doing concours ;)

Offline carm

  • Full Member
  • ***
  • Posts: 139
My compliments to you. Beautiful,beautiful work. Thank-you for sharing your time and knowledge with us. Carm.
1969 GT350 convertible grabber orange
Auto
Built: April 21,1969. Dearborn

Offline mach514

  • Silver Level Subscriber
  • Newbie
  • ****
  • Posts: 24
I would like to offer up a sincere apology for not posting up on this sooner, being in the construction industry in California these days is challenging to say the least. And as the old adage goes work while the work is there. So I've been scrambling these last few months and this is the first chance I've had to sit down and work on this....... First and foremost I would truly like to thank Jeff Speegle for his countless hours and I mean countless hours working on this car, both physically and on a research level. He literally went through every part of this car to make sure the restoration was accurate for a Gt350. Since not many people have gone to the trouble to bring one of these back to this level it took quite a bit of time perfecting the details. This is the first time I've gone down the concours road and man what an eye opener, My hats off to everyone of you that have agonized over the details.
          Second I would like to thank all of you ( Jeff's friends ) that have helped out both answering all of my questions and Jeff's questions, and sharing newly found details, sending over photo's etc. Thank you to all that sold me all of the parts, ( which by the way came from all over the United States, Canada, and even one part through E-Bay that came out of England!!!! )
          Lastly I would like to thank all of the people I've met at the shows, It's amazing the instant bond that forms over these cars. Friends for life.

My apologizes for the poor photo's ( for the engine shot I forgot to swap out the air filter for my correct one ) Jeff's going to notice :-[

P.S. I miss the deep fried mushrooms!!!!!

Offline J_Speegle

  • Administrator
  • Hero Member
  • *****
  • Posts: 24620
Dan  thanks for all the kind words - you know you didn't need to

Enjoy the car ;)
Jeff Speegle

Anything worth doing is worth doing concours ;)